From the outside it seems that there is nothing easier than making ice for cocktails, especially with special molds. In practice, everything is not so rosy - before you make ice, you will have to study important nuances process. Otherwise pure and transparent ingredient for spirits or soft drinks will look like a cloudy gray substance.
Quite often, housewives have a question about how to make ice at home if there is no suitable form at hand. Fans of experiments and creativity have developed several solutions for this case that will help you achieve the desired result with your own hands.
Secrets that will allow you to get transparent ice without bubbles
Frozen water and ice for cocktails are two completely different things. Contrary to the promises of the manufacturers of ice making equipment, it is not enough to pour water into the mold and put it in the refrigerator. Only when carrying out pre-training the final product can be expected to be transparent and attractive.

There are several methods for producing high-quality ice with your own hands:
- Processed water. Pour water into a steel or enameled container (most importantly, not aluminum) and bring to a boil. After the liquid boils for several minutes, cool it naturally. Then boil water again and cool again. In between boiling, do not forget to cover the container with a lid, preventing dust from settling. After processing, pour water into molds and freeze. This approach allows you to get clear ice due to the fact that the air bubbles are removed, and the water molecules fit closer to each other.
Tip: Regardless of the type of ice making approach, professionals recommend always using filtered or potable water. Otherwise, the unpleasant smell will go away only for a while and will be revealed in full after the cube enters the drink.
- Slow freeze. If the time and capabilities of the refrigeration unit allow, then you need to set the temperature to -1ºС. We wait until the temperature rises to the desired one and set the molds in the chamber with water spilled over them. Additionally, it is recommended to wrap the device cling film. The exposure time is at least a day. The slow expulsion of the bubbles as the liquid cools ensures that the ice is clear and even.
- Freezing in a salty environment. Someone suggests using sea water to prepare the base, but if this option is not possible, you can prepare a salty environment with your own hands. True, it will be possible to achieve ideal concentration only by experience. Practice shows that with this approach, one can hope for the desired result even when tap water is frozen. Pour water into a bowl, add salt, stir. We remove the container in the freezer, the temperature should not be lower than -2ºС. After the liquid becomes very cold, lower the ice molds filled with water into it and put it back in the freezer.

The last option is considered the most correct and preferred. In the course of such processing, ice cubes become not only transparent, but also even, without cracks and streaks. All harmful particles will be forced out, so the elements after entering the drink will not cause bad smell. An additional advantage of the approach is that salt water can be kept in the freezer permanently (provided that the set temperature is maintained) and reused.

How to make ice without an ice mold - an affordable creative
It is not necessary to have special molds at home or design them with your own hands in order to prepare beautiful and original ice. If you wish, you can find many worthy ways out of the situation:

- If we are not talking about making cocktails, but about serving one-component drinks, then you can make ice immediately in glasses. This will require suitable utensils capable of withstanding temperatures as low as -1ºС. Just pour a little chilled drinking or boiled water into the bottom of the glass and put it in the freezer for slow freezing. Be sure to make sure that the rest of the container is completely dry. This method allows you to achieve the necessary cooling, and the drink itself in the glass gives an unusual look.
- To freeze water, you can use plastic cups with a bottom of various diameters. Pour the liquid no more than a centimeter and freeze as usual. The output will be original round pieces of ice. They can even be divided into halves or quarters, if you initially lay them with pieces of plastic cut with your own hands from unnecessary bottles.
- Some people manage to make ice with lids. They can be made of plastic or metal, twisted or rolled. The only difficulty is that when removing ice from such products, it is difficult not to damage it.
- If desired, you can adapt parts of the Lego constructor as blanks or silicone molds. You just need to thoroughly disinfect them before use.
- In the most extreme case, you will have to do with plastic bags. We cut them into large flaps or initially take packages of a very small volume. Pour water into them and twist them into balls of various sizes. Put in a bowl and freeze according to the rules.
In addition, you can come up with other no less original variants ice making. The main thing is to act according to the rules, then the components will become a real decoration of the drinks served.
You will need
- - purified water
- - molds or disposable ice packs
- - towel and kitchen mallet (for ice frappe)
- - juice, berries and pieces of fruit (for colored ice)
Instruction
In essence, ice is one of the forms of water that it takes under the influence of negative temperatures. Water from an ordinary water supply contains a lot of impurities; when it is frozen, rather cloudy ice is obtained, which is ugly in appearance and unpleasant in taste. Therefore, following one of the main rules, make ice only from clean water. It is not necessary to go for distilled or bottled. You can use the usual, from the centralized supply system, subjecting it to cleaning in several stages.
Pass the water through a filter with aqualene fibers and boil in a scale-free container. The ideal solution would be to let this water settle. The impurities remaining in it will precipitate within a few hours. Carefully pour the water into another bowl. Now you can ice out of it.
For curly pieces, use very convenient silicone molds for ice. They are sold in a large assortment in hardware stores. Water for making ice in such forms should be at room temperature. An indispensable condition for making ice in open forms it should be frozen in a place separate from the products. Ice is very good at adsorbing odors from the freezer, so place the molds in the designated area in the freezer. If you don't have a dedicated freezer space, use disposable ice packs that don't absorb odors.
If the cocktail recipe involves the use of colored ice, prepare it with the addition of mint leaves or berries. To make the berries and leaves turn out to be pieces of ice, freeze in layers: pour one third of the liquid into the mold, let it freeze, then put the mint leaves, pieces or berries and fill with the remaining liquid. Also prepare multi-colored ice using layer-by-layer freezing.
Some require the use of fine ice chips according to the recipe -. For its preparation in bars, ice is crushed in special crushers. You can cook at home without the use of special equipment. Spread frozen ice cubes on half of a clean cotton towel and cover with the other half. Take a meat mallet and use the blunt side to break the pieces of ice into the towel. After that, pour the ice crumbs into a container, cover with a lid and place it in the freezer. Put the crumbs in the glass just before making the cocktail.
Useful advice
Use only freshly made ice for cocktails.
Related article
Sources:
- How to make ice. Cocktails and drinks
- how to make a cocktail
The oxygen cocktail is a delicious foam of a thousand bubbles. It turns out very simply when filling juice or herbal tea with oxygen. You can choose the flavor that you like best.

You will need
- 1 cup 200–300 ml;
- flavor base - juice, fruit drink;
- foaming composition;
- source of oxygen - an oxygen cylinder;
- air atomizer
Instruction
Oxygen allows you to strengthen and cope with various viruses and infections. This gives the body a surge of strength, improves well-being. Preparing oxygen cocktail using a special one, consisting of an oxygen concentrator and an oxygen mixer. With this equipment Houses time will take a few minutes.
Connect the mixer to the concentrator with a plastic tube.
Beat the prepared solution in a glass for 5-10 seconds, at the same time do not forget to supply oxygen.
Use this cocktail using a wide plastic tube, without stirring, immediately after cooking.
You can use another recipe. Pour into a glass cold juice. Add licorice root. Move the mixture carefully for 20 seconds.
Insert the foam tube into the aerosol dispenser as far as it will go. Remove the cap. Place the aerator in a glass of liquid.
Slightly press the cylinder valve with your thumb. You will see how small bubbles begin to form in the glass.
Save the solution left after work and use it to make a cocktail the next day. Pour the solution into a sterile container and place in the refrigerator. The solution cannot be stored for more than a day, because the oxygen prepared from it cocktail won't have any useful properties.
note
To quickly obtain a stable foam, the temperature of the foam base should not be higher than 20-22 ° C
Useful advice
For the normal functioning of an adult organism, drink an oxygen cocktail three times a day - one in the morning and two in the evening. Children need only one glass in the morning and in the evening.
Sources:
- oxygen cocktails
- how to make an oxygen cocktail at home
Tip 3: What is ice for drinks: cooking methods
Birthday, New Year or romantic dinner- the success of any celebration depends entirely on your imagination and ability to create a festive mood. To pleasantly surprise your friends, there are a lot of important little things and surprises, one of which is the addition of a glass of juice or martini with colored ice cubes.

The art of mixing drinks is very popular. Decorations with fresh berries, mint leaves, or paper umbrellas have become the norm and are somewhat boring. You can meet an abundance of European cocktails with bright hats and candied lemon slices along the edge of the glass in almost every club. This is not surprising, because it becomes more and more difficult to breathe a drop of magic into an ordinary drink every time. frozen ice is also not a curiosity, the only difference is that ice cubes can be served beautifully, stuffed with fruit filling or enlivened with a variety of colors.
How to make colored ice for drinks, features and tricks of preparation
Before you start experimenting, start small and prepare clear, clean cubes. To do this, just take a mold with square compartments from the refrigerator or purchase it at the store. Silicone forms. Some enterprising housewives purchase special bags on clips for freezing. Fill the cells with cooled, boiled water and carefully place the mold in the freezer. If the water is not boiled, you will get cloudy, cracked squares. If everything is done correctly, after 3-4 hours, perfect transparent cubes ice will be ready for use. Forms can be varied - in the form of hearts, flowers, fruits, women's accessories or cat faces. In bars, cubes are often replaced with frosty crumbs - for this, white ice is crushed to a state of shiny crystals. Once in the mouth, the ice crumb has an invigorating effect.
How can you replace or decorate boiled water:
- Green tea, coffee with milk. Don't forget to add sugar for a sweet taste;
- Fruit, natural juices;
- Food colorings. Before choosing a dye, carefully read the composition on the package;
- Berries, pieces of fruit, nuts, mint leaves inside ice cubes.
For a change, colored ropes or threads with beads are dipped into the filled forms. After hardening, it will turn into a festive garland. Colored and transparent ice can be alternated with each other. Important. Do not place molds near products such as lard or fish. The smells of food will be instantly absorbed into the workpiece, and your drinks will have a fish or meat flavor. It is also important to observe expiration dates. Ordinary transparent ice is stored for no more than 6 months, and ice based on juices and berries - no more than 30 days.

Ice is an amazing material.
You can build a real castle from it, make a slide for children, carve sculptures, create a decorative composition for decoration holiday table, make a bar counter and even dishes - for example, cocktail glasses. Professionals from studios specializing in ice construction can help you decorate a yard, suburban area or interior in an unusual way.
But during the New Year holidays, it is much more interesting to become a creator yourself - and to attract family members: you are guaranteed an unforgettable family leisure.
Ice sculptures: professionals work
In Russia, the construction of snow towns and ice slides have long been folk winter fun. And the tradition of erecting ice sculptures dates back to the reign of Empress Anna
Ioannovna. In 1740, for the clownish wedding of Prince Golitsyn, she ordered the construction of the Ice House on the Neva - between the Admiralty and the Winter Palace. The house, 17 meters long, 5 meters wide and about 6 meters high, was built from ice blocks held together by water. Ice cannons were displayed in front of it, ice dolphins flaunted at the gate, ice pyramids towered on both sides of the entrance. Everything inside the house was made of ice - furniture, utensils, a fireplace, and even a bathhouse. The authors of the unique project were the best architects of that time. Since then, in the literal sense of the word, a lot of water has flowed under the bridge, technology has stepped far ahead, and ice cases
masters have learned how to create real masterpieces - and demonstrate them at any time of the year, not only in winter. On New Year and Christmas holidays, you can admire their work on the central streets and squares of the city, at numerous competitions and festivals of ice sculptures that take place in parks - Luzhniki, Sokolniki, Kuzminki, Krasnaya Presnya. There is even a year-round Ice Museum in Moscow.
What can be seen at ice sculpture festivals and competitions:
- ice palaces, slides and labyrinths;
- the most diverse and fantasy sculptures - Santa Claus, Snow Maiden and other fairy-tale characters, animals and birds, cartoon characters, ice chess and much more - these are real outdoor art objects created by talented sculptors.
But the activities of professional studios for the production of ice compositions are not limited to participation in festivals. For private clients they offer:
- installation of ice figures in suburban areas;
- production of interior ice figures, which can be both decorative and functional - used as original vases, candlesticks, seafood dishes, berries, fruits, ice cream, glasses and vessels for drinks;
- construction of ice bar counters equipped with everything necessary for making cocktails;
- unusual gift wrapping - for example, rings placed inside an ice bar look very impressive;
- in addition, ice logos and outdoor advertising are in high demand.
Prices depend on the number of ice blocks used and the complexity of manufacturing. For example, for a figure measuring 50 by 50 by 25 cm, you will need 0.5 blocks, it will cost from 2,000 to 5,000 rubles; for a figure with dimensions of 195 * 100 * 25 cm, 3-5 blocks are needed, the price is from 15,000 to 30,000 rubles, for a figure with dimensions of 500 x 300 x 25 cm, 20 blocks are needed, the price is from 100,000 to 300,000 rubles.
Material for making ice sculptures
The figures are made from ice blocks. The standard size of one is 100 x 50 x 25 cm, weight is about 120 kg. To create large sculptures, several blocks are needed, which are placed on top of each other and poured with water - in order for the seams to “stick together” and a monolithic form is obtained. Blocks can be purchased from companies that specialize in ice carving at any time of the year. In winter, the cost of one is from 1,500 rubles. without delivery.
What is an ice block made of?
For its manufacture, two types of ice can be used - natural or artificial.  Natural, or natural, is river or lake ice. River water is not held in high esteem by professionals: it is not as transparent as in a lake, where, thanks to springs, it acquires a beautiful bluish or greenish tint. Artificial is ice from an icemaker. It is he who is preferred by masters, since he turns out to be perfectly transparent, like a crystal. The fact is that in the ice maker, water is cleaned of impurities and does not stagnate.
In winter, sculptures, if the temperature outside is below zero, are created at the place of their installation, in warm weather - in cold stores at a temperature of -10°C. Do not be afraid that they will melt quickly: even at a temperature of + 25 ° C, they will stand for at least 4 hours. 
Sculptures can be not only transparent or matte, but also colored - companies have special technologies for painting ice.
As a rule, blocks are sawn in half and the inner surface is painted or inscriptions, patterns, numbers are applied to it.
Then the blocks are connected by pouring water. Structures made of ice with illumination look very beautiful - any shade can be achieved with light.
The process of making an ice sculpture with your own hands
Before starting work, the master draws a sketch. Then he puts ice blocks on top of each other, “glues” the joints with water, the number of blocks depends on the size of the product.
For cutting, he uses saws, chisels and cutters, similar to those used for woodworking. It is very important that the tools are well sharpened.
To create a sculpture measuring 2 * 2 x 2 m, an experienced carver will need an average of 2 to 5 days. Short thaws are not terrible for outdoor sculptures, and if the above-zero temperature lasts for several days in a row, it is better to cover them with polyethylene.
DIY ice sculptures
If, inspired by the work of professionals, you want to feel like Pygmalion and sculpt your own ice Galatea - everything is in your hands. The main thing is to stock up ice suitable for creativity and use the right tools.
You will need:
- ice, water;
- instruments
- gasoline or hand saw, straight and angled scrapers, chisel, chisel, cutters;
- additional materials - stainless steel molds, wooden formwork, plastic containers, soap dishes, gouache or acrylic paints, polyethylene, plasticine.
Ice
You can order ready-made ice blocks or food ice, but it is much more interesting to prepare it yourself. Freezing tap water is not suitable: the ice will turn out cloudy.  It is best to use natural ice. Using a hand or chainsaw, you need to cut a block about 100 x 50 x 25 cm in size from the ice cover, preferably not a flowing reservoir.
The fact is that due to the current in the river, the ice is washed away from below - and does not reach the thickness required for work. If you have a pond on your site, ice from it is also quite suitable, the only condition is that the depth of the reservoir must be at least 50 cm. The block size of 100 x 50 x 25 cm is optimal, since it will be inconvenient to work with smaller blocks, and large - difficult to pull out of the pond.
In our middle lane, in natural springs, ice reaches the required thickness by the end of December - beginning of January. If the winter turns out to be warm, you will have to use artificial material.
It is easy to prepare it.
Take a stainless steel form or wooden formwork, cover the bottom with plastic wrap. You can also use plastic containers or soap dishes as a mold for small parts. Fill with prepared water purified from impurities and freeze in the freezer. True, in this case, freezing ice to create a large-sized figure will not work - after all, the volume of the freezer is not too large.
Process
- Sculpt a prototype of the future sculpture from plasticine. Alternatively, the sketch can be drawn on large white paper, wetted, and then applied to the ice mold and cut out along the outline.
- Ice blocks must be connected into a monolith. To do this, put the blocks prepared in advance one on one, pour water and immediately lay the next layer. Continue until you get the array you want. If you want the figure to be colored, add gouache or acrylic paint to the inner layer.
- Take a manual or chainsaw. sawing off big chunks, shape the sculpture. It should be remembered that ice is a plastic material and can be easily processed at temperatures down to -28°C, but you need to work at temperatures from -2°C.
- To work out the details, you will need a straight and angled scrapers. The first - to break off the ice, the second - to turn the figure, make grooves and stripes. By the way, for the same purpose, you can use a chisel or chisel. Check out the sketch.
- When the figure is ready, pour water over it and wrap it tightly with polyethylene. Take it off after an hour.
DIY ice slide
Children will be delighted if, together with their parents, they build a slide for the most fun winter entertainment.
Process
- Carefully prepare the area where the slide will be located: it must be safe, without bushes, stumps and trees.
- Roll up snowballs - there should be a lot of them. Lay them in a slide, leave for a couple of days for the snow to compact. Level the surface with a shovel, make sides and steps.
- Pour the slide from a hose or watering can hot water and wait until the surface hardens. Then level again with a shovel and pour hot water again. All - you can ride.
Do-it-yourself iceware
A win-win way to surprise guests with an unusual serving is to make for festive feast dishes from ice: glasses, glasses, glasses, vases for fruit and ice cream, coasters for bottles. To make shot glasses or glasses, take silicone molds, fill them with distilled or boiled water and put in the freezer. The original glasses are enough for several toasts - then you have to repeat the procedure. Very elegant look vases for fruit or ice cream, made as follows. You will need two deep plates, water, leaves and flower petals. Put the leaves and petals in a plate, place a smaller plate in it, fill the space between the walls with water and put it in the freezer. To remove the ice vase, pour hot water over the plates.
The ice, of course, will melt over time.
But the process of creating ice sculptures or original items for the home will give so many positive emotions that the family will remember these holidays for a long time - and will look forward to the next ones.
Snow and ice sculptures and other snowy winter fun

“The bunny had a bast hut, and the chanterelle had an ice hut ...” - the fairy tale says. To create a similar miracle in your area, you do not need expensive materials and tools. Use improvised material - snow and ice!
Sculpt from the snow
The snowman became a kind fat man only in the 19th century, at the same time the famous canonical appearance appeared: a body of three snow globes different sizes, a bucket on the head and a nose made of carrots. Everyone probably knows how to mold such a character, but besides the classic snowman, you can sculpt a lot of interesting things! For example, you can turn a snowman upside down and give him real boots or felt boots! Or fashion your favorite cartoon characters from the snow. And if you recently had a good rest at the sea or discovered in yourself a passion for something monumental, take on the creation of marine life from snow. To create such a masterpiece, “heavy artillery” is already required: shovels, scrapers, and even snow throwers or even tractors, but the result is worth it. Of course, it won’t be warm, like at sea, on the street, but you will collect enough “likes” in social networks!
Building a snow fort
If you have a big friendly company, why not arrange snow battles? Build real fortresses out of snow! The best conditions to create a snowy town are relatively high temperature (about OH) and high humidity. Just roll the balls like a snowman and stack them on top of each other. Unfortunately, such a fortress will look a little sloppy. Then shape the snow globes into square blocks with a shovel. Another way is to collect wet snow in 10-liter plastic buckets and tip them in the right places like molds in a sandbox.
With more low temperatures building is also possible. Here you can not do without containers for snow and water. Snow during frosts is very dry, so it needs to be moistened: snow is collected in layers in a bucket or other container, each of which is spilled with a small amount of water from a watering can or a perforated plastic bottle.
After the frame of your fortress is ready, make it unique - think over the original appearance. Cut through windows and doors, loopholes, etc. maybe even snow tunnels. For the most upper part buildings place the flag. And don't forget to prepare a sufficient amount of "ammunition": snowballs after the construction of the fortress will come in handy!
Angel in the snow
For those who like to wallow in the snow, there is a great idea - to create a snow angel! Find an area with an even layer of freshly fallen snow without extraneous marks, stand with your back to it and squat down. Then just lie down on the snow (it is important that your head is imprinted well) and spread your arms to the sides, spread your legs shoulder-width apart. Move your arms up and down the surface of the snow without bending them. to make angel wings. Also bring and spread your legs several times to make a skirt. Now it is important to rise without damaging the creation!
ice sculptures
If Rodin's fame haunts you, try yourself as an ice sculpture maker! They can be made from both natural and artificial ice. To do this, a block of ice is cut out of the ice cover of the reservoir with a chainsaw, which can later be used to create a sculpture.
At the same time, be careful: if the temperature a few weeks before was above 8 C, in no case step on the ice - it can still withstand you, and under the weight of the ice block it will crack. But such ice will not be of very high quality: it contains a lot of foreign impurities and air bubbles that make the ice cloudy. Even if you try to independently cast blocks of the required size from pure water, there will be no “crystal”) transparency - air bubbles will still remain inside. The secret of making perfectly transparent blocks lies in the constant circulation of frozen water: in this way, much less bubbles are formed and the ice becomes suitable for sculpting.
To carve a sculpture from a finished block, you need to arm yourself with a chainsaw - it is with its help that the first outlines of the future sculpture are given to the ice. When this stage is completed, the work is continued with cutters and a drill. If unnecessary “burrs” and bumps appear on the surface, heat these places with a regular hair dryer. The final touch is dousing the finished sculpture with cold water. After this procedure, let the figure harden.
Having fun is extreme and expensive
For extreme people who want to try something new, we can recommend an attraction that is just starting to gain popularity in our country - zorbing. Its meaning is to lower a person in a transparent ball - a zorb - down a mountain or overcome any obstacles in it. The ball itself consists of two spheres: external and internal, between which air is pumped. A passenger climbs into the inside of the ball, who is already called "zorbonaft". It is thanks to the thick air layer, which gives some cushioning, that a person is comfortable enough to be inside.
Original taken from vodolei_idei in "Ice Ideas" with your own hands
Ice is a whole world of entertainment in winter. Ice is beautiful. Ice is creative.
Ice is a space for imagination and original ideas. Tableware, decor, games, candles and lamps, houses...
Something I'll try to tell you...
Ice is frozen water. Can you put flowers there? Someone came up with this idea - to put a rose in ice vase
- it will melt, gradually opening the flower ... romantic ... But only for a winter party.
Follow the link - description http://pastelwhite.com/2012/12/23/diy-frozen-roses/
Ice Wreath.
A regular cake mold will do to make it.
They will look bright and elegant in a winter snow garden.
But you can decorate them not only with a winter garden, but also use them as a decoration for a festive table.
In order for the "stuffing" to shine through the ice beautifully, it must be transparent.
HOW TO MAKE ICE TRANSPARENT AT HOME?
But "muddy" opaque ice is also effective. Such ice can be made ice buckets for champagne and lamps for candles.
Transparent and opaque ice can be combined to achieve the desired effect, as in the bottom photo.
This is such a "wreath - candlestick".
You can freeze inside any filling - for example, shells.
original openwork candle can be done with ice.
ICE FLASHLIGHT FOR THE STREET
The craft of ice lanterns is that the water near the walls freezes faster than inside.
Therefore, when a sufficient layer of ice has frozen, the excess water is simply drained.
To supplement it with something or not - the creator decides)
ICE WARE
Almost by the same principle, you can make ice glasses. 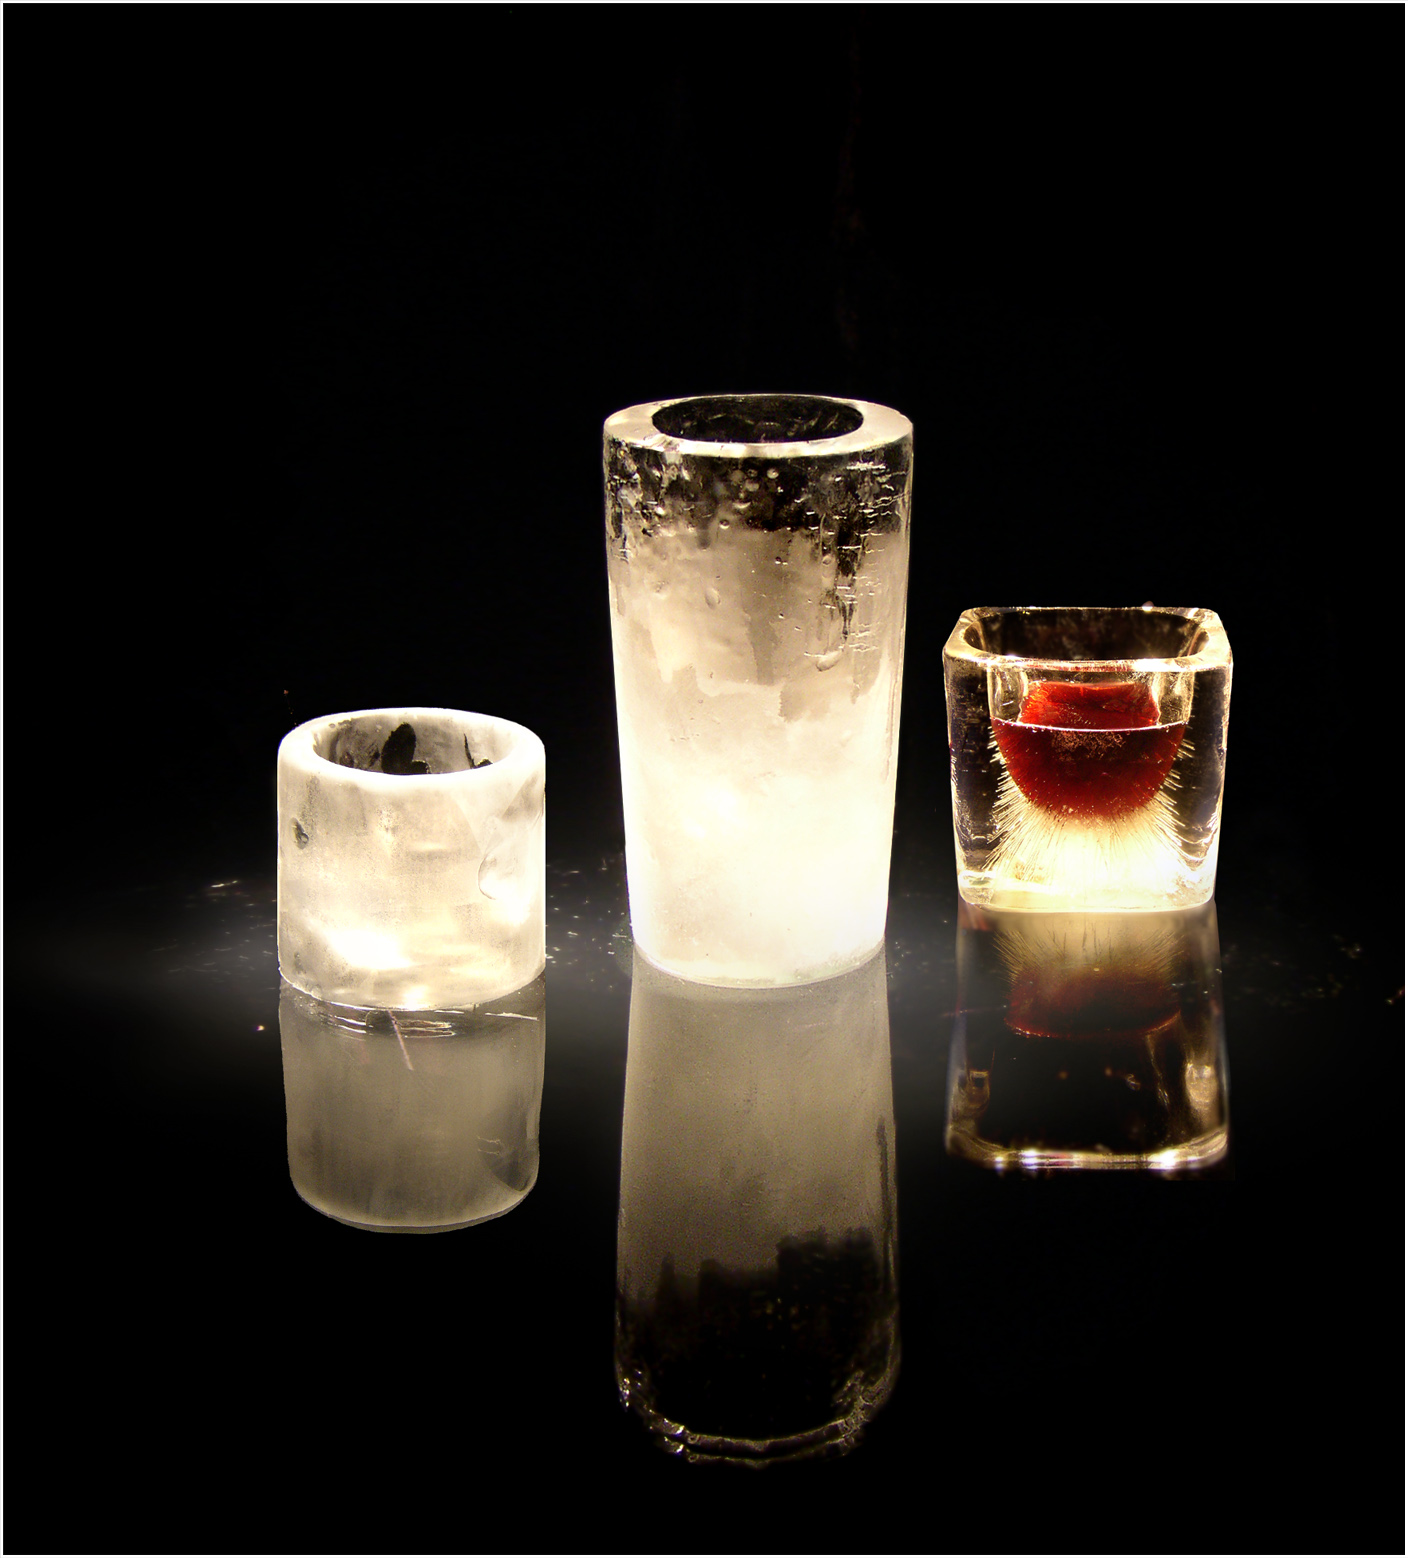
Containers for caviar from ice.
Ice dish for fruit it’s also easy to do - the shapes of a 5-liter water container are recognized, and the technology is the same: poured - froze - drained excess water.
And these summer ice containers with walls of flowers and herbs are unusually good, and just as simple in execution.
Cremanka for ice cream. What a beauty)))
various containers, different stuffing, different application.
By the way, the bottle does not have to be frozen - you can do ice stand under her.
Two containers of different diameters: the smaller one should correspond to the size of the bottle and be heavy (you need to fill it with something) so that water does not push it out.
And here is a very laconic stand.
In general, iceware is already made to order, professionally.
Buffet ice table at the wedding.
JUST ICE CUBES
Ice cubes are the easiest thing to create. But ordinary cubes can also be made festive, original.
Cubes with rosebuds, for example.
Or with cherries.
Or - with berries cut into pieces?
Or with fruit juice or puree.
Or - very gently - with flowers.
FIGURED ICE.
Ice figurines - the simplest ones - can be made by pouring it into disposable glasses or yogurt containers, adding dyes, berries and leaves, bright plastic toys of your choice.
And the thread must be frozen there - hung on branches.
A more complicated mold can be molded from foil.
And confess your love to your (your) beloved (beloved). Inexpensive and touching idea for Valentine's Day.
You can freeze ice in children's molds.

It’s not bad to freeze a snowflake inside or tint it.
Perfectly fit and different forms - for ice.
Yes, and just freeze a layer of water in a dish, put something there - it will turn out round ice pendant.
Inside is a frozen napkin.
Lime inside.
Pendant with orange and berries.
UNUSUAL FIGURES
By purchasing original forms, you can do, for example, ice rings.
Different forms - different figures.
But with the help rubber glove you can be famous Halloween ice hand.
For a cocktail.
For cold soup.
What about playing?
ICE PINS
Necessary:
9 plastic bottles filled with 0.5 - 1 liter of water,
1-3 balloons, a small amount of ink or other paint,
1 night of time for the skittles and balls to freeze.
For any holiday, you want to surprise guests and make dishes and drinks not only tasty, but also beautiful. And the easiest and most affordable option to decorate them is to serve original ice. It can be made different in shape, color, size, but the most important nuance in such a seemingly simple matter is to take high-quality water and properly prepare it. Then a beautiful serving of a dish, a drink will be ensured - you can easily surprise guests or just people close to you, and they will thank you with their enthusiastic words of gratitude. How to make clear ice at home the same as in any bar? Consider the options below.
Ice Recipes - Irresistible and Easy Homemade
A practical liquid that can be used for this. Making ice cream at home is no longer a rarity. The quickest or least expensive type of "prep" is to pour yogurt or juice into small ice molds. Before that, another stem and into the freezer. Within a short time you have ice on a stick. However, it is probably not ice in that sense. If you have an ice machine, you can make real ice. And at the same time, you have all the possibilities of fresh ingredients that leave incomparable taste any other ready-made ice cream in the shade.
How to get clear ice?
In fact, everything is simple - ordinary physics:
- If there are no air bubbles in the frozen water, it will be transparent.
- If there are a lot of bubbles in the water, it will turn cloudy when frozen.
Why it happens? When freezing, the liquid solidifies unevenly, but starting from the edge. Therefore, layer after layer of water accumulates all the air in the center. And when the air has nowhere to get out, and the center begins to freeze - that very muddy middle appears. Therefore, to make ice transparent, air must be removed from it. There are several options for this.
Even without an ice machine, this is possible at home. You only need 2 bowls, water, salt and ice cubes and some patience, but above all. From then on, you must stir every 10 minutes and then refrigerate. How to make ice cream creamy and the best and what you should pay attention to, there are many tips and tricks.
As for the variety of ice recipes, there are no longer any prohibitions on bringing something completely unusual to the market. Chili and parmesan ice cream linseed oil, wasabi ice cream, cucumbers and many other gourmet and delicious ice cream options are found in parlors, restaurants and ice cream recipes. The special thing about homemade ice cream is that you know exactly what ingredients it was made with. Milk from happy cows, fruit from organic or perhaps even our own farming.
Ice maker - professional option
You can always buy a special device for freezing water, which is used in most bars. Today there are many different options for ice makers - from simple home models to large professional ones.
The essence of the device is that the water in it freezes in layers, preventing air from getting inside. But this device is quite expensive.
entertainment, and if you do not need a lot of ice, you can get by with improvised means.
Herbs, spices, whatever your heart desires, pure with it. Those who respect a few important rules have made themselves and their tormentors content with this and appreciate his home-style ice cream room. What a shock: while spring is still scratching at the door in Berlin, he's already there in Frankfurt. And the second joyful surprise follows, namely, that today's workshop takes place outside.
But the afternoon sun was just pushing through the tall building gangs and is now radiating directly onto the star of the day: ice. In large 25 cm blocks of edges, it stands on a concrete bar in the hotel courtyard. There are also knives, pimples, three-tooth scratches. Today he is obviously rustic.
home methods
Experienced bartenders know exactly how to make clear ice at home, without the use of special equipment. To do this, there are several simple methods.
Method one
For this option, you will need to prepare:
- clean water, passed through a filter, or purchased in a store, but without gas;
- a container for boiling, such as a saucepan;
- freezing molds.
Creating ice with this method involves several steps:
Alessandro Romano heads the workshop. He has been running his bar in Cologne since opening over six years ago. Ice is by far the most overlooked ingredient in cocktails. But basically they only produced bad and small ice cubes, air-filled ice cubes or empty ice cubes that always melt instantly in a guest glass. This has spread in the bar and beyond, even in other types of businesses, today you get good, twice frozen, dry ice cream ice cream.
However, not as pretty as in "One Mor" where you carve it from a block and carve it - Romano met the ice sculpture in his time at the Burj Al Arab and brought it to his bar. The ice was frozen in an old refrigerator, the hardest part, he tells the workshop participants, was Clarkegen: "Milky glass" looks silly, the ice should be clear, like a spring-cleaning window. They tried many things: filtering, boiling, even with an electric current, it moved the water to keep the surface moving, to get rid of the dissociative gases that make the ice cloudy.
- Purify water from excess salts and weigh or take already cleaned.
- Pour the liquid into a container and boil.
- Cool it down at .
- Boil the water again - this will take more air.
- Cool the water, pass it through the filter.
- Pour water that has cooled to room temperature into molds and freeze.
Important! Ice obtained in this way is more transparent than freezing ordinary water.
You need a styrofoam box and leave a lid. Then it freezes from top to bottom, and gases only down, and then cut off. But how do you get such a small block? The employer shows how it works: Mark the center of the ice by drawing a line from top to bottom with the brine. In this mild depression, gently pound with the pickle or 3-pack until the ice breaks from top to bottom. Then crush the piece to have a rough shape almost in glass, from which a large cube is cut, for example with a knife, with great care.
He looks as simple as he is. Now the bartenders want to try their hand, the work lessons begin, and surprisingly fast beautiful results are available: cubes, spheres, even diamond shapes. According to Romano, 70 diamonds are being prepared for special drinks at Ona Mor. They are just waiting to be used in the refrigerator. With ice in a big piece, not only cold drink, but also very small melt water, and today it is an eye socket. This is an improvement for the guest. He's got something in the glass that's not going anywhere, says Romano.
There is also a method that does not require boiling water.
Method two
In order to make clear ice at home without boiling, you will need:
- clean water (it is better to filter it several times or buy it);
- large capacity for freezing;
- ice molds.
What to do with all this:
- About two liters of pure water are frozen in a large container, after which, the frozen lump is taken out (the easiest way is to dip the bowl in warm water and turn on a lint-free towel).
- Then you can break off the ice from the edges with something sharp, gradually getting to the muddy center, which is not needed. There is also an option when the middle with air is washed out with water.
Next, the extracted split pieces are again laid out in molds, wait until it melts, and are again sent to freeze until cooked.
Method three
If the freezer functions allow, slow freezing can be used. To do this, you need to set the temperature in the chamber to -1, wait until the camera dials it, and put the prepared water in the freezer. In this case, it is better to wrap the forms with cling film.
A prototype designed by the creators of the "noble bath", which, perhaps, knows from high-class bars as "room". How could you smoothly point at the bar at the idea and order a long cliff with this ice. The third ingredient in a drink, which is so important after alcohols and fillers, should often play a leading role.
Here and now he did it anyway. Have you noticed that the ice they serve in restaurants is clear, but the ice cubes you take out of the fridge are opaque and white? Regular ice leaves are opaque when dissolved gases in water are trapped and forced to remain in small bubbles, or when the ice freezes in a way that does not allow large crystals to form. Because of these impurities, opaque ice weakens and melts faster than pure transparent ice. Expert experts have discovered several ways to make "premium" ice without having to go to a restaurant.
Important! Such a freeze lasts about a day, but then all the air will have time to completely get out of the water, and the ice will turn out to be even and beautiful.
Method Four
This option involves creating a salty environment. First you need to prepare saline solution from sea or ordinary table salt.
Steps to make clear ice:
Freeze in descending order
Try the following methods to make clear ice cubes at home.
Freezing at temperature
Freezing from below. Unlike the previous methods, this method is a very fast way to create clear ice cubes, except this is your first time using it. It works even if you pour water directly from the tap into the bucket. Air bubbles can be removed by freezing the ice from the bottom up. You can do this by putting the bottom in contact with something very cold. It is advisable that you use liquid for this, because this way you can completely cover the bottom of the buckets, which helps to get rid of the heat quickly.- Water is poured into the container and salt is added - the required concentration of the solution is achieved empirically, since the freezing conditions are different.
- Salt must be completely dissolved in water.
- Next, the container is placed in the freezer at a temperature of -1 or -2 degrees, but not lower.
- After - you should wait about ten minutes, put the molds filled with water into the saline solution.
- This freezing will occur for about 12 hours.
Important! This method is considered the most efficient. Also, its advantage is that salt water can be kept in the freezer all the time, and ice can be frozen as needed.
One liquid that can be used to freeze ice cubes is salt water. Of course, sometimes you will notice that the ice in your drink is a little cloudy and even white. But that's not good either, is it? The cubes have this aspect because the water used in their development has been frozen on the outside. This means that impurities such as dissolved minerals and gases move to the center of the tray during the crystallization process.
These cubes not only look worse, but much worse than the clear cubes as they melt much faster. This is the main reason why clear ice is better than cloudy ice, and it can also turn your whiskey on the rocks into a watery drink in seconds. Let's find out how clear ice can help you get the most out of your favorite drink.
These methods will help you make crystal clear and beautiful ice for drinks, without bubbles. And it will definitely be no worse than in the coolest bars. If you don’t have an ice mold at hand, don’t worry, you can also make it yourself, at home.
Making an ice mold
There are a lot of ways to make ice without a mold, it all depends on your
fantasy. Here are some interesting options:
You may have read that to create clear ice you first need to boil water, or use distilled water, or boil distilled water, even twice just to be on the safe side. The key to forming clear ice is freezing at a slower rate.
If you are from a cold country or have visited some during the winter months, you will see crystalline icebergs that form in pipes and trees. These icebergs are so transparent that they form very slowly. Layers are formed one on top of the other, and this prevents impurities from getting inside.
- If it is assumed that the drink will be consumed without mixing it in mixes or cocktails, then there is an option to immediately freeze the water in the drink serving dish. At the same time, please note that the dishes must be resistant to temperature extremes and compression from the cold. Also, its walls must be absolutely dry. For such a freezing, it is necessary to pour an amount of pure water onto the bottom of the dish, and put it in the freezer for a day at a temperature not higher than minus two degrees. Serving drinks in transparent containers, in addition to the necessary cooling, is also very unusual.
- To get frozen water in the form of rounds, you can take plastic glasses of various sizes. Water must be poured only on the bottom, 0.5-1 cm high, and frozen. If you lay the bottom with plastic in half or in 4 parts, you can get ice in the form of halves or quarters of a circle, respectively.
- Plastic bottle caps or metal caps are also capable of replacing round ice molds. True, you may have difficulty obtaining it from the covers.
- If the same ice is not needed, you can use the substrate from assorted sweets. Choose those substrates that will not wrinkle or leak. As a result, you will get interesting shapes sweets.
- There is also an option to use as a form of a children's designer or sand molds. Be sure to rinse, degrease and sanitize any of the molds well before use.
- Usual plastic bag easy to turn into a freezer mold. Just pour some water into it, tie a knot, pour more water, tie another knot, and so on until the bag is finished. Of course, the form of freezing in this way will not be even, but if you follow the rules for preparation, then transparency and the absence of bubbles are guaranteed.
You can use any of the options you like or come up with your own to make clear ice and shapes for it.
Currently, there are machines that mimic this process well. But if you don't want to leave your paycheck in a see-through ice machine, we've got the secret so you can do it at home with things you're sure to have on hand.
The only thing you need to make clear ice at home is to reduce the rate at which the ice freezes. One way to do this is to put a small fridge in the fridge. Anything you put inside this refrigerator will freeze slower and so air bubbles will have a chance to escape before being caught on the ice.
To make clear and clean ice, you need quite a bit, but do not forget about additional recommendations:
- Water absorbs odors well, so when cooking, make sure that there are no strong-smelling foods nearby.
- You can also use a thermo bag for freezing. Just put the mold in the bag, and put it in the freezer at a temperature of about minus 8 degrees. The water will freeze in the opposite way - from top to bottom, which means that the air will come out of it in a different way. Such ice may be a little cloudy on top, but not in the middle. So - if you leave ice in a bowl for a while room temperature, cloudy water will melt.
- When using boiling, it is better to take stainless steel dishes. Aluminum containers are not suitable for this method.
- Do not pour hot water into plastic molds, and do not put cold water in the freezer. Otherwise, the mold may melt and the refrigerator may leak.
- If you want to surprise your guests, do fruit ice: Blend fruits with a blender and add juice, sugar or syrup to them. After - pour the mass into molds and freeze.
- When serving ice without drinks, the best option would be to use a special bucket - a cooler.
- It is more convenient to take ice with tongs, so it will not melt ahead of time.
If you want to make your ice clear, follow these instructions. Fill the entire water cooler and pour it into the freezer with or without the lid open. Wait until the unit is completely frozen and take the refrigerator out of the freezer. Place the block in a clean plastic bucket and let it soak for an hour or so. Use a saw blade to mark the remaining block between the molds. Using the handle of the knife, carefully break the ice. The ice you get should be almost completely clear. If it's a little cloudy on top, you can cut it open with a saw blade.
- Get a small refrigerator that fits inside your freezer.
- Prepare pallets of cubes or molds and place them in rows.
Mojito and others, the presence of crushed or cubed ice is required. If the drink is intended for your own consumption, then there are no problems - you froze the water and the problem is solved. And if ice for cocktails is required in large quantities for guests? Let's find out how to make homemade ice of the same quality as it is served in bars and restaurants.
Make some clear ice and serve with a dinner prepared for the occasion. Learn more about ice, how to make amazing cocktails and more. When the experience is over, you may notice that the ice does not have any marks or bubbles of any kind, on the contrary, the ice is clear and transparent like a crystal. Why did this happen? Because boiling water so many times it is possible to extract all the trace of air contained in the water and dissolve its minerals. The resulting ice will be clear as if it were glass and can even be consumed without any problem, even this ice can be a cocktail treat if a mint leaf or some flower is inserted before becoming ice.
Crystal clear ice can be obtained at home
Why is homemade ice not transparent?
In cocktail bars, they always put perfectly shaped transparent cubes, without a single crack. And we shake out a gray incomprehensible frozen mass of uneven shape and with obvious bubbles from the molds. What's the matter? It seems that the answer is obvious - many freeze chlorinated water, because such a result. But even spring or well water will look exactly the same, and here's why:
The first thing to do is to give him a needle, and for this you need to rub it into the magnet repeatedly and always in the same direction with the poles reversed. Thus rub the needle against the magnet from one end to the other for about one minute without stopping. Once ready, quickly insert the needle into the floating object. Assuming it is a small piece of cork, pierce it side to side with the needle. Finally place the object with the needle inside the water container and watch what happens.
What will happen is that slowly the magnet will point north like a compass. In fact, you can confirm this with a professional compass, you will see that both are pointing in the same direction. If you want to try something else, you can slowly move the magnet around the container and watch it change the direction of the needle points. All this is explained by the way the needle was magnetized. When magnetism is applied to the magnetic poles, residual magnetic material is left at opposite ends of the needle.
- ordinary water contains various impurities and gases, which give opacity when it freezes quickly. Professional ice is made exclusively from purified water;
- Cubes become cloudy when frozen quickly. With slow cooling, gas and air bubbles are displaced from the water, which does not occur at shock temperature.
clear ice recipe at home
To get clear ice, we need clean water. It can be distilled liquid, commercially bottled or purified using a reverse osmosis system.
Pour the liquid into a glass or enamel container and bring to a boil, then let it cool. We repeat the process one more time. During boiling, do not cover the pan with a lid, but in the process of cooling - be sure.
Prepare your freezer. Ideally, if you have a modern freezer in which you can adjust the temperature. Set the temperature to -1⁰. There should be no strong odors in the freezer. If the freezer is unregulated, use this method:
- pour ordinary hot water into any frost-resistant container and sprinkle with table salt;
- put salt water in the freezer for several hours;
- if the water freezes - there is not enough salt, you need to redo the solution to a stronger one;
- when you have found a suitable concentration, dip ice molds into the solution and place in the refrigerator.
Salt water will not allow liquids to quickly cool and freeze, crystal clear cubes will be achieved.
What can be used instead of molds

These are the original ice molds used by the Japanese!
Everyone has a mold in the refrigerator in which ice is frozen, but that number of cubes is hardly enough for cocktails for two people. What can be adapted to freeze water at home:
- Candy inserts.
- Plastic cups.
- Lids from plastic bottles.
- Silicone molds for baking.
- Walnut shell.
- Cream molds.
- Large details from the children's designer.
At worst, wrap the water in portions in ordinary plastic bags (food, of course) in a kind of balls. All household items that will be used to freeze homemade ice must be boiled or at least doused with hot water. Tabs for sweets should not be boiled and doused with hot water.
Crushed Ice can be obtained by crushing frozen liquid in a canvas bag. To do this, take a rolling pin and beat the bag with it until you get a crumb of the right size. A blender will do the job well. Some models even have special knives for crushing ice cubes.

