Cake is a must for any celebration. family tea party or just a friendly meeting. Self-cooked is generally aerobatics, and if it is also decorated, then the guests will be delighted with your hospitality!
There are many techniques for decorating cakes: cream, marzipan, fruit, jelly, etc. But if you are expecting guests, you already have a lot of worries and you should prepare a lot of dishes. Therefore, we will consider one of the simplest and quick options decorating cakes with cream roses. Although this method pleases with its ease, outwardly it looks simply chic and quite intricate!
Don't rush this step; you want your cream cheese was free-flowing, otherwise it will not merge with the cream. Transfer the reserved whipping cream to the bowl with the softened cream cheese and beat on medium speed until the mixture is smooth and has a frosting texture.
Oil cream for roses
Transfer ½ of the frosting to a large bowl and set aside. Fold the chilled raspberry pink compote into the remaining frosting until the color is uniform. This is what you will use between the crepes. To assemble the cake: place the crepe on a flat dish. Spoon about ½ cup of raspberry pink cream on top of the crepe and spread it ⅓-inch from the edge. Continue spreading pancakes and cream, finishing with crepe on top. Gently press down on the fixing cake to flatten upper part and, if necessary, press the cream into the upper layers to the edge.
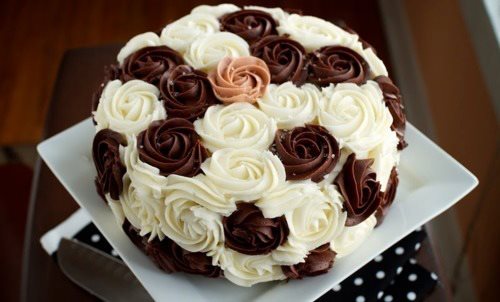
Roses for cream cake
For decorating a cake, dense, thick cream oil based. If you want to get a colored drawing, add a little food coloring to the cream, otherwise, the color of the decor will be white.
How to make custard for cake
For home custard you will need: powdered sugar- 250 grams, butter- 125 grams, boiling water, food coloring- optional. Mix all ingredients until a homogeneous mass.
Freeze the cake with the proprietary whipped cream mixture and refrigerate until set, at least 1 hour. Makes 1 6 inch cake that will serve 6. If you can't find almond flour, make your own. Place the almonds in the bowl of a food processor or blender and process until they form a wonderful meal. You will be able to get finer food in a blender. Adding a tablespoon or two of sugar will help keep the almonds from turning into almond butter.
Feel free to experiment with other nuts here. Walnut and pistachio are great substitutes. Place all ingredients except oil in a blender. Mix on high speed until the batter is smooth and uniform, stopping occasionally to scrape the sides of the bowl, about 1 minute.
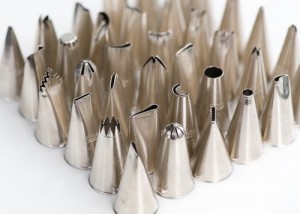
We put the cream in a pastry bag with a toothed nozzle (see photo) and proceed to decorate the cake with roses.
Tip: if you don’t have a pastry bag on hand, you can replace it with a homemade counterpart. To do this, take a tight milk bag and cut off the tip. Also, baking parchment is suitable for these purposes.
Heat a 6-inch flavorless saucepan over medium heat. When the butter has melted, pour ¼ cup into the center of the pan. If necessary, gently swirl to cover the bottom of the pot. Loosen the edge with a flexible heat-resistant spatula, then flip and cook until the other side is golden brown, about 30 seconds longer. Move the crepes to a wire rack to cool. After the crepe has cooled slightly, it can be laid.
Crepes can be made 1 day in advance. Stack pancakes and wrap tightly with plastic wrap until you are ready to assemble your cake. Makes about 10 6" crepes or 6 8" crepes. If you are using a more delicate brand, you may need a little more. Always add rose water to a very small quantities because as soon as you add too much, your dish will taste like soap.
We squeeze the cream in a spiral, thus forming a rose, see the video below. Decorate the sides of the cake first, then the top.
Tip: To make the cream roses stick better on the cake, first cover it with a thin layer of cream, and then decorate.
Another simple option for decorating a cake with butter cream, see photo.
Place corn starch into a small bowl and add a tablespoon of water. Stir to dissolve the corn starch, then add the mixture to the raspberries. Remove saucepan from heat and stir in lime and rose water. If you are using stevia, turn it on now. Cool compote at room temperature for about 20 minutes, then transfer it to the refrigerator and cool to cold. Compote can be made up to 3 days in advance and stored in the refrigerator.
How to make colorful roses
This is definitely a dessert for chocolate lovers only, rich, moist and chocolaty, it's like really going into chocolate heaven. For this recipe, you need to use high-quality cocoa powder and chocolate good quality as their combined flavors will make the cake either heavenly or completely disappointing. The cocoa based cake is really moist and soft, doesn't need any extra syrup to get it moist and melt in your mouth.
Happy tea!
Cream roses are very easy to make. Just a few movements that will take 10 seconds. The main thing is to prepare a cream for roses
There is different variants cream for decorating the cake: protein, butter, Charlotte cream (custard). Choose a cream for sweet flowers that always works well and keeps its shape.
No extra sugar in this frost and it's amazing. The recipe is simple, decorate the cake in any way you like and enjoy the most amazing chocolate dessert. Add hot coffee and stir. Place the chocolate and 1 ¼ cups of cream into a small saucepan. Put on very low heat until the chocolate melts. Stir in cocoa powder, then remove from heat. Meanwhile, dissolve the gelatin in the water and let it swell for 5-10 minutes. Place the gelatin over low heat just until the gelatin has dissolved and pour it out of the melted chocolate mixture. Let cool completely. Beat chilled 2 cups whipping cream until stiff peaks form. Fold carefully chocolate mixture into whipped cream. Assemble the cake. Place 1 layer of cake on your serving plate. Gradually spread a thin layer of frosting over the top and sides of the cake. Place the rest of the glaze in a piping bag fitted with a star tip. Start on the side of the cake. To make the rose, start in the center, then move the tip in a circle around the center point once or twice depending on how big you want the rose to be. When the side of the cake is filled with roses, continue on top. Fill the remaining gaps with some frost. Refrigerate until you are ready to serve.
- Butter and flour dust two 9-inch round cake pans.
- In a large bowl, whisk together flour, cocoa powder, baking soda and salt.
- In another bowl, mix sugar with eggs and butter until completely combined.
- Mix in buttermilk and vanilla extract.
- Turn on the flour mixture until it blends well.
Rosettes from protein cream you can’t decorate the wet surface of the cake (if there are jelly, jam, cream, sour cream- they are able to dissolve the decoration). It's better to plant them oil cream(or cream, from which they are made) or on glaze or mastic.
Protein cream for roses
This is the recipe royal icing(Royal icing) - by Boris Burda. Its protein cream is prepared in a cold version, nothing needs to be heated. If you have your simple recipe protein cream for roses, share. So:
Roses and rosettes from vegetables and fruits
Is it possible that you used more cream to melt the chocolate? was the chocolate mixture almost liquid when you folded it into whipped cream? Let me know maybe we can figure it out together. Simply made and delicious! You can make your own buttermilk by adding 1 tablespoon white vinegar up to 1 glass of milk and let it sit for 15 minutes. I also had the problem that the frost was too liquid too. This giant rose pie is a show stopper!
And thus the giant was born pink cake. The upper was actually really light. You'll need one special technique, a giant pink tip, but other than that, it's really just layer upon layer of rose petals. If you look closely, absolutely none of them are perfect, and most of them are bigger than little floppy disks and grouchy but put together, the overall effect is a rose like you find in nature: imperfect but beautiful. Most roses in nature aren't just one solid shade, so layering color in one bag helps give the color a realistic hue.
Thick royal icing is incredibly quick and easy to make. Thoroughly whipped to a smooth, silky texture with no air bubbles, it is the perfect decoration for cakes.
A drop of blue food coloring will make the glaze boil white, and a little glycerin will prevent it from becoming hard as cement.
The recipe below prepares enough frosting to make a 20 cm round cake (two layers and simple decorations).
How to fix oil cream when peeling
So let's talk about the actual design and what you need. Most regular grocery and craft stores probably won't. It's not overly expensive and once you have it you can also use it to inflate large ruffles and bags and it's great for topping up cupcakes.
- The flower on top needs a lot of glaze.
- Hope you're on board.
- Giant pink tip.
- 3 egg whites;
- 700 grams of powdered sugar (almost 4 cups, a little less);
- 2 drops of blue food coloring;
- 1 teaspoon lemon juice;
- 1 teaspoon of glycerin.
Preparation of royal icing (B. Burda)
Mash 3 egg whites with a wooden spoon and half (350 g) of powdered sugar (sift through a strainer). Add lemon juice, blue food coloring and glycerin.
How to make a giant dew pie
Line four 8-inch cake pans with parchment rounds, and spray parchment and pan sides with non-stick spray. Combine the sugar, pie flour, baking powder and salt in the bowl of a stand mixer fitted with a spatula insert. Mix on low speed for about a minute to combine the dry ingredients. Lightly beat the egg yolks and about a quarter of the milk and vanilla extract and set aside. Add the remaining milk and softened butter to a large mixing bowl and mix on low speed until the dry ingredients are moistened. Turn the mixer to medium speed and mix for one and a half minutes. Scrub the bottom and side of the bowl with a rubber spatula, and give the batter a few more stirs to make sure it's all included. Divide the dough evenly between four pans - if you want to weigh it, each pan should get 15 ounces of dough. Let the tortillas cool on a wire rack for 10 minutes, then carefully turn them inside out and let them cool completely. If you do this in advance, they may stay in freezer within a few weeks. Let them partially thaw until they are firm but not stoney before assembling. You may have some leftover decoration - just store it in the refrigerator for up to 2 weeks or in the freezer for up to 4 months. Unite egg whites and granulated sugar in the bowl of a large stand mixer and beat together. Choose a small pot that fits snugly into the base of the parking mixer at the top of the pot - this is your temporary bath with hot water. Place the bowl on top of the saucepan, making sure the bottom is not in contact with the water, and heat the egg white mixture. Whisk frequently so that the egg whites do not boil. Continue heating the egg whites until they are hot to the touch, and when you rub a little between your fingers, you will not feel any buzz from the sugar. Once the whites are hot, transfer the mixing bowl to the mixer and place it with the collar. Beat the whites on medium speed until they are shiny, hard, voluminous meringue and warmer to the touch, feel the outside of the bowl and make sure it is around room temperature. Reduce speed to medium-low and add softened but cool butter in small chunks, a tablespoon at a time, be sure to wait between additions. In this case, he may come off or look a little sullen - don't be afraid. Once all the butter has been added, increase the speed again and beat until it comes together and is light and fluffy. If it doesn't come together after 5 minutes, refrigerate the mixing bowl for 5-7 minutes to chill the mixture and beat it again until it thickens and is silky smooth. Add vanilla extract and salt. The oil can be made in advance and stored at room temperature if you intend to use it the same day or in the refrigerator. If it has been refrigerated, let it sit at room temperature until it is completely soft and then fluff it up again to get a smooth texture before using it. Divide the remaining frosting into 3 bowls and color them in various shades of pink, from light pink to deep, dark pink. If any of the cakes have a rounded top, carefully cut the top off so they are "flat". Place the bottom cake layer on the cake toppers. Place about 1 cup of the deepest pink frosting in the center of the cake, and use a metal offset spatula to spread it evenly towards the edge of the cake. It's fine if some frost extends over the edge. Place the second cake on top and repeat the process with the medium pink. Add another cake round, spread it out with the lightest pink, and finally bring it back with the fourth cake round. Spread a very thin layer of frosting on the top and use a spatula to smooth the sides of the cake, spreading the frosting that has extended over the edges around the cake. Fill in any bald spots with a little more frosting - the goal is to have a very thin layer of frosting covering the entire cake to seal in any crumbs. Once the cake is firm, place it back on the turntable and spread the green frosting over the sides. Get a nice even finish, then use a metal offset trowel and run it over the sides to smooth green color. Transfer the remaining green frosting to a piping bag fitted with a green leaf tip. To make a rose on top, place the giant pink tip in a large piping bag. Place the white frosting inside the bag, scraping the side of the bag with the wider end of the pink tip. Place equal amount light pink icing inside a bag located where the narrower end of the pink tip is. Hold the tip perpendicular to the top of the cake, with the wide edge touching the bottom and the narrow edge pointing up. Squeeze the piping bag as you turn the cake on the turntable so that the freezing occurs in a spiral. Once you have a nice spiraling "rosebud" in the center, start running the petals around it - refer to the video to see the technique. Once your rose is about half the size of the top of the cake, stop and switch piping bags. So make a second piping bag fitted with a giant pink tip and fill it with the same mod as the first one. This time, use white, light pink, and then dark pink on the side of the bag with the narrow end of the tip. Continue winding the petals around the outside of the rose and working your way to the edges. Once the top of your cake is decorated, grab a green piping bag and scoop everything around outside of the top of the cake. Add some leaves going down from top to bottom. This cake is best enjoyed at room temperature. Leftovers can be stored, well wrapped, in the refrigerator for up to a week.
- Add an inch of water to the bottom of the pot and bring the water to a boil.
- Separate 1 more cup white glaze and put it off for now.
- Place chilled brownies on cardboard brownies.
Gradually add the second half (350 g) of powdered sugar and beat. Do not beat too vigorously so that air bubbles do not form. If you are using a mixer, the speed of rotation of the whisks should be minimal.
Where to buy food grade glycerin
food glycerin for confectionery can be bought at a regular pharmacy.
If you don't have blue dye and don't need a very white cream color, take it easy and don't look for it.
Custard protein cream for roses
Other variations of protein cream for jewelry use sugar syrup, in which, while still warm, proteins are seized (brewed, thickening).
Usually syrup is prepared in parallel (cook until it starts to stretch and a drop on a cold saucer is like a soft ball in consistency) and beat the whites. Both processes take approximately the same amount of time.
For the syrup
- Boiling water - 100 ml;
- Sugar - 350 g (approximately 1.5 cups);
- Citric acid - 1 teaspoon.
To boil water. AT hot water add sugar and citric acid. Simmer until weak small bubbles appear (the syrup turns white at this point).
For the protein part of the cream you need
- 5 proteins;
Cool the egg whites and beat well. The consistency of whipped proteins should be such that they do not fall out (do not flow out) from the mixer bowl when turned upside down.
Then - combine the syrup with the proteins (pour the syrup into the whipped proteins in a thin stream). Continue whisking for another 15 minutes.
And then fill the cornet with cream and make roses.

Oil cream for roses and cake decoration
You can make a simple butter cream with sugar or powder, or based on condensed milk.
Proportions for a simple buttercream
- Oil + sugar in the proportion of 200 g of oil per 1 cup of sugar.
- Butter + powdered sugar in proportion: 200 g of butter per 100 g of powder (a little more than half a glass);
- Butter + condensed milk in the proportion of 200-350 g of butter per 1 can of condensed milk (regular or boiled).
How to make buttercream
Add sweet to butter gradually. Beat until waves appear (the cream becomes smooth and falls in waves). Cool it down a bit and make roses.
Whipping oil temperature
The butter is whipped either at room temperature or slightly warmed up and sugar, powdered or condensed milk are added to the warm softened butter in a spoonful.
How to fix oil cream when peeling
If the butter cream was beaten (they beat it for a very long time, they didn’t stop in time and it began to delaminate into oil and water), it can be warmed up a little and beat again. But roses must be made from chilled cream, otherwise they will spread.
Another option is how to fix the cream: put the cooled exfoliated cream on a fine sieve and let the water drain. And then you can warm up a little and beat again.
Dyes for cream
It is more useful and more reliable to tint the cream with something natural (just edible). For example, slightly dilute instant coffee boiled water or a drop of cognac and combine with cream. Or add cocoa to the cream.
If you want to give roses red, pink and other interesting colors, you can mix the cream with food confectionery colors. For protein cream, you can not take liquid dyes, this will badly affect the structure of the cream.
How to make edible rose leaves
If you decorate with roses chocolate cake and if you want to make chocolate leaves for roses, you can slightly warm up the chocolate (melt it, it will flow quickly) and grease the leaves of fresh basil or mint with it. So that the layer of chocolate hardens right on the green leaf. And then, when the chocolate grabs, remove the leaf. A small chocolate bar will reflect the pattern of the leaf.
Or you can simply add mint leaves to food roses (especially if you are decorating sweets), or basil (it looks most like rose leaves). For savory dishes, any edible greens that can be found in the house will do.

Video - how to make cream roses
The key is manual dexterity.
You will need such a thing for making roses, which can be easily twisted in your hands, and the rosette can be molded on its flat base.
Such a flat disk on a stick looks like an axle with a wheel from a toy car. Or, our housewives still take a piece of bread to make cream roses. The nozzle for making roses should give out a flat ribbon, a ribbon of cream. In the foreground, just such a nozzle.
If you are laying the rose cream on tracing paper (baking paper), you can grease it a little with oil so that it is easy to remove. Or, you can famously cut roses with simple scissors, as in this video.
The nozzle for a pastry bag should be with a hole through which an even flat strip comes out (that is, not round, but flattened at the end).
If you do not have a pastry bag, you can use a bag (cornet) folded from baking paper and cut off at the end.
The principle of making roses from cream
First, the base is made (the skeleton of a pink bud, such a cone-slide), petals are layered on it.
The petals are applied to the base of the rose by moving diagonally from top to bottom, twisting the base of the rose in the right direction (towards the movement of the cream).
Roses and rosettes from vegetables and fruits
How to make a rose from a tomato
This beautiful vegetable rose is made from the skin of a thick, tough tomato or boiled carrot. Be sure to feel it, if the tomato is overripe. Some people think that oval-shaped tomatoes (cream) are better for making roses, others cut flowers from simple round tomatoes.
You also need a small knife for tomato flowers.
The principle of making a tomato rose
Remove the skin from the tomato in the form of a spiral (like peeling an apple) and roll the vegetable spiral into a bud.
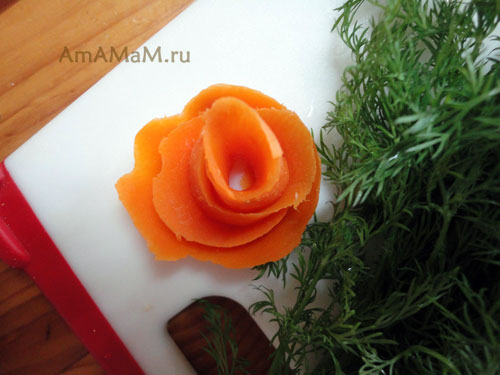
Boiled carrots can also be cut with a ribbon and twisted into a rose flower.
By the same principle, you can cut boiled in a spiral carrot(boil in uniform, peel and then cut a rose out of it), beets(if you are not afraid that it will color the dish), orange peel and other strong and not brittle skins of fruits and vegetables. A fluffy rose can be made from a skin kiwi.
In the same way, you can fold roses from ribbons (satin, nylon).
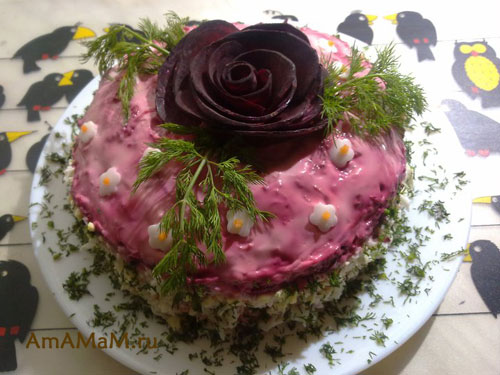
A beetroot rose decorates a herring under a fur coat prepared by Inga Ferenczi.
You need to start work from the top of the tomato.
- Cut off the lid from the top of the tomato, but not completely, but, as it were, going into a spiral to move on to a new circle.
- Carefully cut off the entire skin from the tomato in a spiral. The skin layer is thin, the movements of the knife are small, gentle, without sharp bends and sharp jerks. It is necessary to keep the spiral for the rose intact and unbroken.
- Twist the tomato skin into a rose, starting from the last tip. Rolling the tomato skin into a pink bud must also be done very carefully so as not to tear the ribbon. The last one will be the cap that you cut off at the very beginning - this is a flat, stable base for the entire vegetable flower.

These roses can be made from thinly sliced \u200b\u200bmeat. Ready-made roses from tomatoes can be stored in the refrigerator for 4 days (cover with a lid so that they do not wind). But I would advise not to keep chopped vegetables for so long. It is better to decorate salads and other dishes with freshly prepared rose flowers.
In addition, a rose can be made from a tomato, cut into slices, as from raw carrots(see below).
You can also twist thin strips of salted red fish or bacon in a spiral.

Carrot rose on a festive salad
What to do with a peeled tomato
The hostess in the video uses the leftovers (peeled tomato) to make tomato and mozzarella snacks. Everything is very simple. Cut the tomatoes and mozzarella into slices and put on a dish, alternating red and white circles.
Sprinkle salt on top (better - sea or coarse grinding), sprinkle olive oil and sprinkle with pepper and oregano. And then decorate with tomato roses. Simple snack from tomato with mozzarella is ready!
Rosettes from radishes
These simple and pretty roses are made from radishes. It must be washed and cut off the tip. It is not tedious to pick (cut off) the greens, it will be the stem of the rose and its leaves.
The principle of preparing roses from radishes
Cut off the tip, cut the radish vertically from 4 sides (blank petals).
Bend the petals to the sides (carefully so as not to break).
Raw Carrot Rose
It is very simple and beautiful to make a rose from carrots.

This rose from half a tomato was made by Inga Ferenczi following the same principle as the rose from a raw carrot.
By the same principle, roses are made from tomatoes and raw potatoes(but it darkens quickly, you need to sprinkle it in lemon juice or hold it in acidified water). If you want to tint rose petals from potatoes, then put the sliced slices not just in acidified water, but in water with pieces of beets or radishes.
This rose was made from tinted beet potatoes. From below it is fastened with wooden toothpicks so that it does not fall apart.

The principle of making roses from carrots or potatoes
Purified raw potatoes or carrots must be cut into very thin circles (potatoes can also be oval thin slices).
Pat the slices dry with paper towels.
Lay out circles of vegetables in one line, overlapping. And twist them into a tube - you get a rose bud.
Then a long bud can be cut in half - so each rosette will gain stability. At the bottom, vegetable roses can be fastened with wooden toothpick studs. And in the video, the girl does not even fasten them. Anyway, carrot roses look pretty.
In the same way, sweet roses are made from marzipan or marshmallow mastic. See the recipe for details step by step photos making a flower (rose) from mastic.
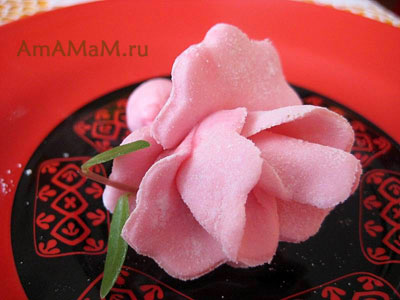
Rosette from mastic. It is done very simply. See recipe.
How to make strawberry roses
There are different options for making strawberry roses.
The first way is to cut the berry in layers (vertically) and overlay another berry with the resulting petals. In the same way, you can make roses from other fruits (for example, from a peach - just pour its pulp lemon juice so as not to darken). The first stage: we cover the strawberry with slices of another strawberry. sliced in layers.
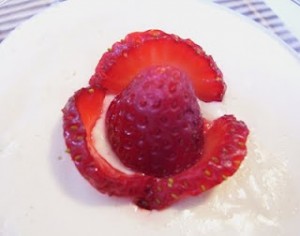
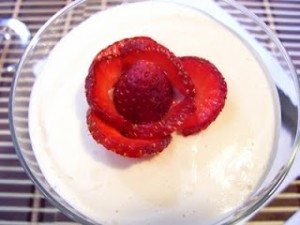
We continue to cover the bud (berry) with petals.
Here's what peach and strawberry rose look like on panna cotta (Italian cream jelly).
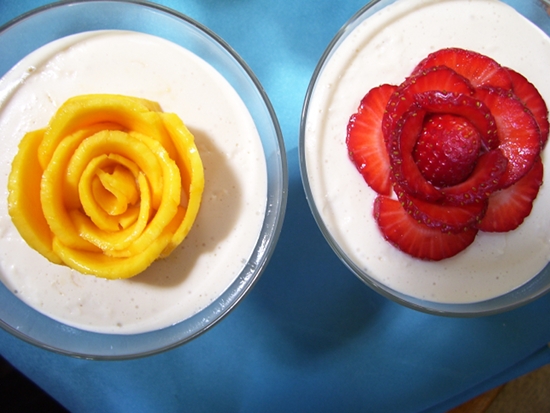
Peach and strawberry blossoms on a creamy dessert.
The second way - how to make a rose from strawberries is to slightly cut the berry in the places where you want to make the petals and bend it out a little.
The same principle is used here as in the technology of cutting a rose from a radish, only more petals can be made on a strawberry and the cut is not so deep so as not to break off the scarlet petals.
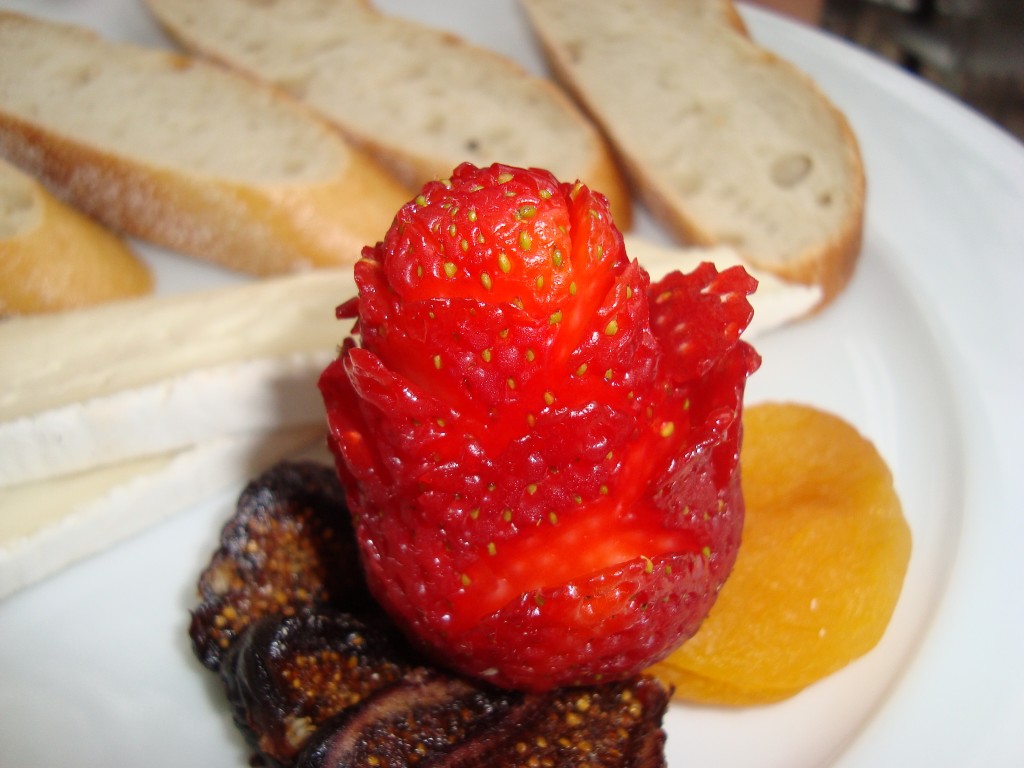
Here is a rose obtained from incised strawberries. Simple and fast. Photo: sylvanend.wordpress.com
If you have other ideas for making roses with your own hands - write, we will add your tips and photos to the story.

Carrot rosette on Olivier salad

