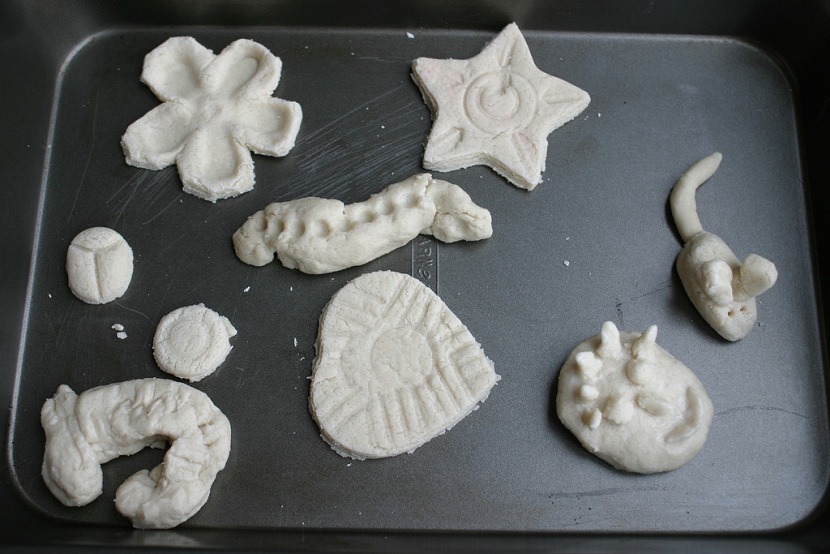
It is convenient to sculpt flat, slightly convex figures from the dough. This property of the test can be used by creating bas-reliefs from it - convex images on a plane.
Material and tools: a board sprinkled with flour, a rolling pin, a knife, a sharpened pencil, a glass of water, a thin brush, a rag or sponge, a little vegetable oil.
Dough: flour - 1 cup, salt - 1 cup, vegetable oil- a tablespoon, water - half a glass.
Mix all the ingredients and knead well on the board to get a soft homogeneous mass. Put the dough in the refrigerator for 2-3 hours. After that, you can sculpt from the dough. Put the remaining dough after sculpting in a plastic bag and store in the refrigerator until the next time.
The techniques for modeling from dough are the same as for modeling from plasticine.
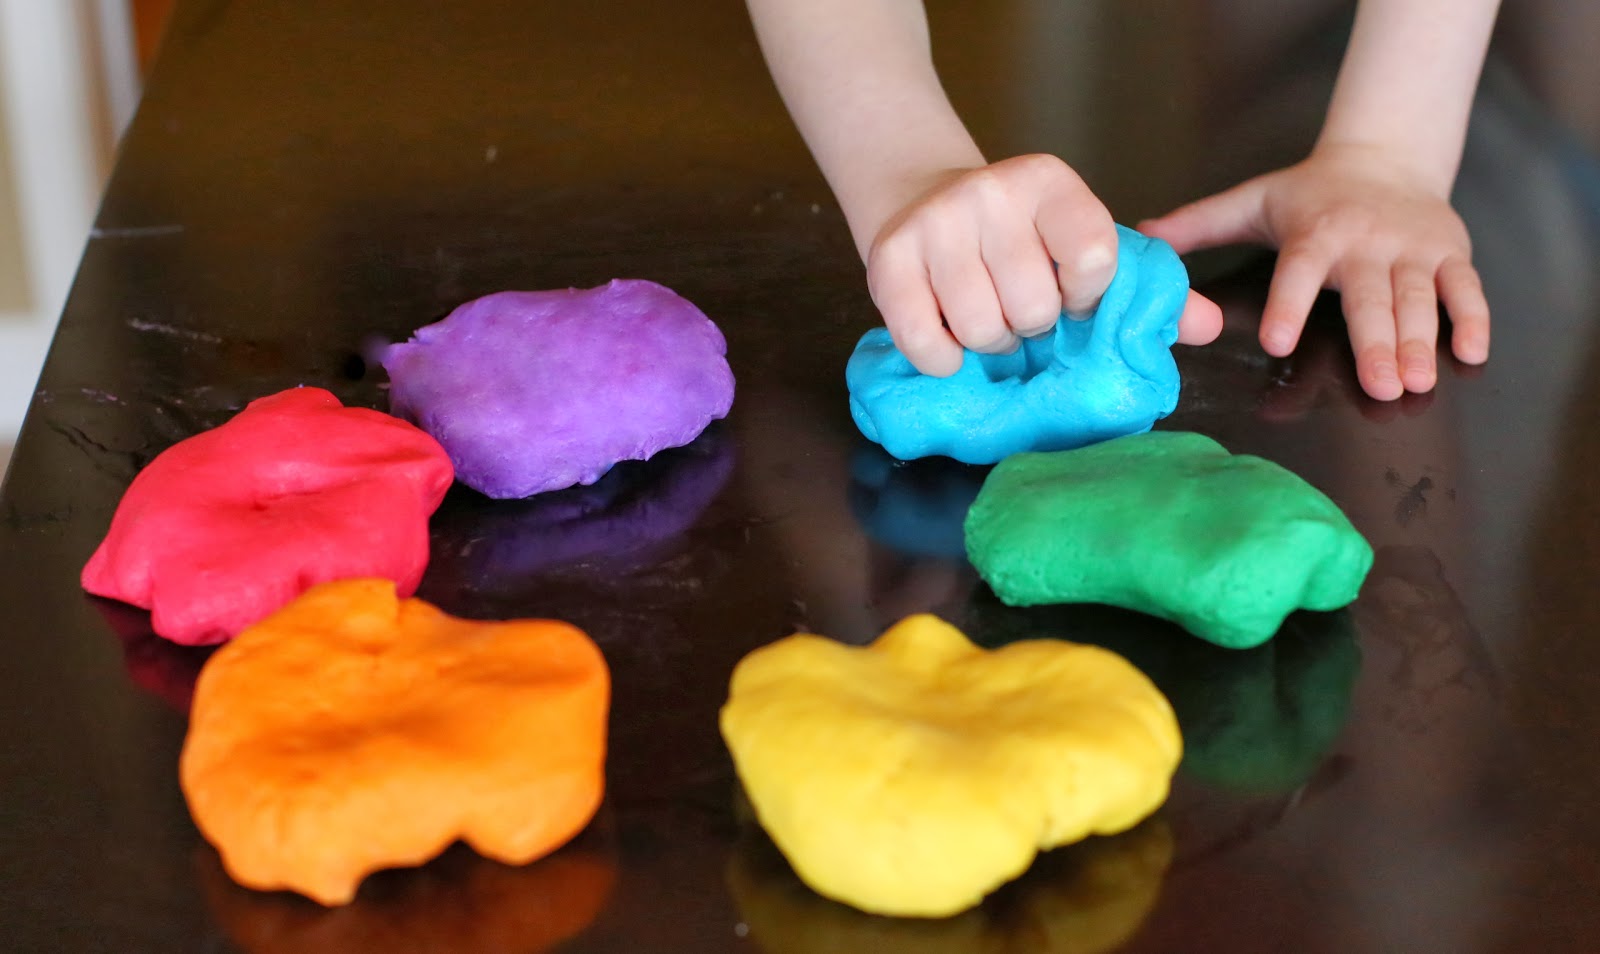
colored dough
Part of the mass for modeling can be left unpainted (it has a light beige color), and part can be painted in different colors using gouache paints. If you sculpt from colored dough, you will not have to paint finished products. This is especially important if small children will be sculpting, for whom it is still difficult to accurately hit a certain place with a brush.
You will need unpainted salty dough and a set of gouache or acrylic paints. Paints must be in a pasty state. If they are dry, add some water to the jars and wait until the paint softens.
Take a piece of dough in your left hand, such that it fits freely in your fist. Make a dent in the middle of this piece. With the index finger of the right hand, scoop up a piece of paste from the jar and place it in this recess.
Close the edges of the dent so that the paint is inside.
Roll the dough ball up and down between your palms. Hands get a little dirty, but it doesn't matter - the paint is easily washed off with water. And so that the dough does not stick to your hands very much, moisten them with sunflower oil.
Having rolled out a long sausage, fold it in half and roll it again. Repeat this operation until the “marble” stains disappear and the color becomes uniform. If the dough becomes too soft after adding paint, add a little salt and flour to it.
Prepare a set of colored mass in this way. Leave part of the dough uncolored - it will play the role of white. Store the dough of each color in a separate plastic bag or in a yogurt jar with a tight-fitting lid.
Pieces of colored dough can be mixed, like paints, and achieve the shade you need. To do this, you just need to take two pieces of dough and knead them together until then. until the dough becomes homogeneous:
Blue + white = cyan;
White + red = pink;
Blue + pink = purple;
Blue + yellow = green;
Yellow + red = orange;
Green + red = brown;
Green + blue = emerald.
And don't forget to stock up on flesh-colored dough! In order to make such a dough, you need to add a little bit of yellow to light pink.
Excess colored dough that remains after sculpting can be mixed into one lump so that they do not dry out. The result will be an "incomprehensible", most likely gray-brown color. But he, too, can be useful for something.
From colored dough you can make pictures, toys
|
Modeling from salt dough with children of primary preschool age. Master class with step by step photo Author: Natalya Gennadievna Komissarova, teacher of MBDOU No. 196, Izhevsk. Description: given Master Class designed for children of primary preschool age, educators, teachers of additional education, parents and other creative people. Purpose: crafts can be used to decorate the Christmas tree and as a gift. Purpose: making a gift from salt dough "Mitten... |
|
Candlestick made of salt dough for children 3-4 years old. Step-by-step instructions with photoAuthor: Komissarova Natalia Gennadievna, teacher of MBDOU No. 196, Izhevsk city. Description: this master class is intended for children of primary preschool age, educators, teachers of additional education, parents and other creative people. Purpose: Candlestick can be used to decorate the interior and as a gift. Purpose: making a souvenir from salt dough. Tasks: - to consolidate the skills ... |
|
Magnet " winter hut» from salt dough with your own hands. Step-by-step instructions with a photo Author: Safin Denis, 11 years old, a pupil of the creative association "Testoplastika", MBU DO Center for extracurricular activities, Romanovskaya village, Rostov region, Volgodonsk region. Head: Markina Natalya Ivanovna, teacher of additional education, MBU DO Center for Extracurricular Activities, Romanovskaya village, Rostov region, Volgodonsk region. Description: the master class is intended for children of school age... |
|
Salt dough pig. Step-by-step instructions with a photo. Author: Sorokina Natalia Valerievna, teacher of additional education, MBOUDO "DDT" Navashino, Nizhny Novgorod region Description: the master class is intended for children of senior preschool and primary school age, and can also be used in individual work with children with disabilities, for parents and teachers who are fond of creativity. Purpose: can be made as a gift as a souvenir, used ... |
|
Pig "- a symbol of 2019 with your own hands. Master class with step-by-step photos Author: Semenova Svetlana Petrovna, teacher of the MDOU "Kindergarten" Ladushki " Purpose of work: crafts can be used as a gift, a souvenir for New Year. Description: the master class is intended for children of senior preschool and school age, for teachers of preschool institutions and additional education, for lovers of creativity. Do you hear the door squeak? The pig is at the door! Friendly everyone... |
|
Pig - a symbol of 2019 from salt dough. Step by step master class with photoMK is intended for children with disabilities of type III-IV, but can be useful to all creative and gifted children and teachers. A "pig" can be made with a magnet and presented to relatives or a string can be threaded and not a Christmas tree hung. Purpose: - development of creative imagination; - development of fine motor skills of hands; - development of memory, attention and thinking; - development of the ability to work according to a template, according to a photo. May the Pig bring you good luck, And provide m... |
|
Do-it-yourself salt dough aquarium for children 6-7 years old step by step with a photo This material is intended for older preschool children, teachers, parents and creative people. Purpose: the subject-developing environment of the kindergarten, the creation of a board game. Purpose: Development of graphomotor skills. Tasks: - develop fine motor skills, creative imagination, fantasy; - generate interest in working with salt dough; - formation of skills for working with salt dough; - educate acc... |
|
Do-it-yourself panel "Coat of arms of the Russian Federation" Step-by-step instructions with a photo Panel "Coat of arms of the Russian Federation" from salt dough. Master class with step-by-step photo Author: Malysheva Natalya Konstantinovna, senior counselor of the MBOU "Zubovo-Polyana Gymnasium", Zubova Polyana village, RM Description: This master class is intended for students, teachers and teachers of additional education. Appointment. The work can be used as a craft for an exhibition, serve as an interior decoration in the classroom. ... |
|
Do-it-yourself piggy from salt dough The master class is designed for children aged 6-10, kindergarten teachers, primary school teachers, parents, creative people. Destination: 2019 is the year of the earth pig, this souvenir can be used all year round as a souvenir for acquaintances, friends, relatives. The purpose of the master class: To teach children how to make souvenirs from salt dough. Goal: To cultivate accuracy in work, attentiveness and love for decorative and applied art, to develop ... |
|
A flower on a stick made from salt dough. Master class with step-by-step photos for beginnersAuthor: Komissarova Natalya Gennadievna, teacher of MBDOU No. 196, Izhevsk city. Description: this master class is intended for children of primary preschool age, educators, teachers of additional education, parents and other creative people. Purpose: A flower on a stick can be used to decorate the interior and as a gift. Purpose: making a souvenir from salt dough. Tasks: - complete... |
|
Rowan from salt dough. Step-by-step master class for children 3-4 years old. Author: Natalya Gennadievna Komissarova, teacher of MBDOU No. 196, Izhevsk. Description: this master class is intended for children of primary preschool age, educators, teachers of additional education, parents and other creative people. Purpose: making a souvenir from salt dough. Tasks: - to expand the children's understanding of the rowan berry. - strengthening the ability to roll out the dough in a circular motion, pinches ... |
|
How to make currants from salt dough with your own hands. Step-by-step master class with photo Author: Malysheva Natalya Konstantinovna, senior counselor of the MBOU "Zubovo-Polyanskaya Gymnasium", Zubova Polyana village, Republic of Mordovia. Description: This master class is intended for students, elementary school teachers and teachers of additional education. Purpose: the work can be used as a gift, work for an exhibition or serve as an interior decoration. Purpose: making crafts from salt... |
Salt dough modeling is an exciting activity that can bring a lot of pleasure to both little fidgets and adult uncles and aunts. Salt dough is an excellent malleable material from which you can make a lot of interesting crafts, including whole paintings that radiate the warmth of the master's hands and homeliness.
Video catalog of works and ideas for modeling
To create a real masterpiece, you will have to try hard, but absolutely everyone can master testoplasty, especially since this technique does not require any unique abilities and expensive materials. If you set a goal, you can find everything you need without leaving your home, there would be a desire. For children, making crafts from salt dough will become not only interesting, but also a very useful activity, since fine motor skills of the hands are directly related to the development of speech, thinking, attention, imagination, visual and motor memory, and any joint creativity brings together.

How to make salt dough for modeling
Almost every master uses his unique recipe dough, so today we will offer several recipes at once. All recipes are good, but each is good in its own way. One is more suitable for small products, the other for large ones, the third is suitable for working with children. By experimenting with different components, you can decide on the optimal recipe.
Salt Dough Recipes
back to contentsFirst option: universal dough
- 1 glass of salt
- 1 cup wheat flour
- 1 tbsp vegetable oil
- half a glass of water
Pour a glass of salt and a glass of flour into a large bowl. Mix with a spoon. Pour half a glass of water and a tablespoon of vegetable oil. Mix with a spoon and knead with your hands until smooth, as well as plain dough. To make the mass more plastic, we replace the water with jelly from starch. To prepare jelly, dissolve a tablespoon of starch in 1/2 cup cold water. In a small saucepan, bring another glass of water to a boil. While stirring, pour the starch solution into the boiling water. When the contents of the saucepan become transparent and thicken, turn off the heat, let the jelly cool, and then add it to the mixture of flour and salt instead of water.
If the dough is too soft, at the bottom of the bowl, mix a tablespoon of salt with a tablespoon of flour. Press the dough ball into the mixture and knead. If necessary, repeat the procedure.

The second option for simple models
- 200 grams of flour
- 200 grams of salt
- 125 milliliters of water
- (before adding to the dough, the glue must be diluted in warm water to the consistency of sour cream)
Third option for large models
- two glasses of flour
- one glass of salt
- 2/3 cup water
It may take a little more water, its amount depends on the type of flour. In terms of density, the modeling dough should resemble softened plasticine. To prepare dough for hot water pour out the salt, wait until the salt is completely dissolved, and the water has cooled. Add flour (the second grade is quite suitable) and knead the dough thoroughly.
back to contentsStrong salt dough for tiles and boards
- 200 grams of flour
- 400 grams of salt
- 125 milliliters of water
- 2 tablespoons plain wallpaper glue
Fifth option: salt dough for delicate work
- 300 grams of flour
- 200 grams of salt
- 2 tablespoons plain wallpaper glue
- 4 tablespoons of glycerin

To in finished product crystals did not come across, and the surface turned out to be smooth, the salt for making the dough should be finely ground. If only coarse salt is at hand, before kneading the dough, it should be ground in a coffee grinder or diluted with the amount of water specified in the recipe. It is better to choose inexpensive varieties of flour without emulsifiers, baking powder and other additives.
Ready dough Wrap in cling film to keep from drying out and refrigerate for a few hours. This will make the dough more elastic and easier to work with while sculpting, and it will not break on the sides.
For children, choose recipes that do not contain glue.

Uncolored dough will have a light beige color. To give the product a warm bread shade, we take half of the wheat and rye flour from the amount indicated in the recipe. use one rye flour undesirable, because the dough will be hard, inelastic and will crumble.
Using watercolor or gouache, you can paint either ready-made figures, or color the dough even at the kneading stage. For coloring dough, gouache paints, food colors or natural food colors are perfect: fruit and vegetable juices(beetroot, carrot juice, parsley juice), cocoa, coffee. The dough of different colors is stored in separate plastic bags or jars. Just like paints, pieces of colored dough can be safely mixed to obtain the desired shade:
- blue + white = cyan
- blue + yellow = green
- green + blue = emerald
- blue + pink = purple
- white + red = pink
- yellow + red = orange
- green + red = brown

Salt dough crafts
While the dough is cooling and reaches the desired condition, you can prepare workplace and everything you need for sculpting. First of all, we free the table from foreign objects and cover it with oilcloth. We may also need:
- a working board for rolling out the dough (you can use a piece of thick cardboard covered with a sheet of baking foil on top)
- rolling pin (can be replaced with a smooth bottle)
- knife with a thin blade
- cardboard
- pencil
- tassel
- floss threads
- aluminium foil
- various small things: buttons, corks, matches, coins - to create embossed surfaces; beads, cereals, foil - for decoration.

Almost everything is used for modeling dough: buttons and fabrics for textured prints, various seeds and cereals for original ornaments, dried flowers, fresh embossed leaves, twigs, etc. Wet fabrics and objects slightly with vegetable oil before printing so that they do not stick to the dough. Beautiful buttons, pebbles, glass beads, glass beads, beads, shreds and lace, threads and chains can not only be printed, but also “imprinted” directly into the dough. If you fire your products in the oven, make sure that the beads are not plastic, but glass, and the threads are not synthetic.
Since the dough dries very quickly in air, it must be kept in tightly closed jars on the desktop. Each time it is necessary to take exactly as much dough as necessary, and immediately fold the excess back.

Testing can be done in several ways. Firstly, you can roll out a layer of dough, cut out various flat figures from it, and then make a composition out of them. However, in order to get a three-dimensional product, it is better to mold individual parts, and then combine them into a planned composition. Wet the joints with a brush and gently press with your finger. A toothpick will help attach the head to the body.
To create a picture or a plate based on the board, first roll out the dough one and a half centimeters thick, cut it out desired shape, let it dry for several days and only after that we apply the rest of the details, using the same salt dough, diluted to a mushy state, as glue. Fresh parts are held together with a brush and water.

To make a nice frame, you can first draw a sketch on cardboard, then cut it out and stick it around with dough, and when it dries a little, attach small details.
When working with volumetric vertical figures, a wire frame should be used. Inside large bulky products, you can put tightly formed baking foil balls, boxes or jars, carefully tightened with dough so that no holes or cracks remain. In this case, the manufacture of the product will require less material, it will not deform during drying and will dry much faster.
If after work you have left unused dough, wrap it in an oilcloth or a plastic bag and put it in the refrigerator. This will keep the dough from drying out and spoiling for several months.

Drying, firing, coloring and varnishing
In order for dough products to gain strength, they must be air-dried or burned in the oven. The first option will take quite a long time, since during air drying the moisture from the product evaporates very slowly. In good weather, in one day the product will dry out only a few millimeters. It is better not to put crafts from the test on the battery, because it is likely that they will simply crack.
It is better to use the combined method - first dry the product a little in the sun, and then burn it in the oven. The product must not be baked! It should not be baked, but dried at the lowest temperature, while the oven door should be slightly ajar. In this mode, the product should be fired for one and a half to two hours until it turns red and the dough hardens. In case of overheating, bubbles and cracks will appear on the figure.
After drying or firing, salt dough products can be painted and varnished. Acrylic paints can be used for coloring, but artistic gouache with the addition of a small amount of PVA glue is best. This mixture, after drying, will give the product a slight sheen and will not stick to the hands. Acrylic varnish is perfect for varnishing, it is non-toxic, water-soluble and dries in just 6-8 hours.
back to contentsMaster class on making funny cats
Modeling has a beneficial effect on the child, his creative imagination, mental abilities, develops fine motor skills of the hands and gives a wonderful mood. In this article, we have prepared a selection simple crafts from salt dough especially for children.
You will need: a glass of wheat flour, a glass of extra salt, half a glass of cold water, a bowl.

Recipe

The finished salt dough should not stick to your hands or crumble. It should be cool and comfortable to sculpt. I recommend watching the video tutorial!
There are two most common ways to dry salt dough. The first way: the finished craft will dry itself. The main thing is that direct sunlight does not fall on it, otherwise it will crack. The craft can be put on a flat surface and wait a few days. The second way: the finished craft is dried in the oven for 3 to 6 hours (depending on the size of the craft). Drying takes place intermittently. One approach is 1-2 hours. For quick drying in one go, set 75-100 degrees in the oven, and then the craft will dry in an hour. At a temperature of 120 degrees, the craft will dry in 30 minutes, but it is better to dry it naturally.
There are two most common ways to color salt dough. The first way: after drying, the finished craft is painted with acrylic paints or gouache using a brush. The second way: food coloring is diluted in water, then added during the preparation of the dough. When the craft is completely painted and dried, it must be covered with a transparent manicure or furniture varnish in 2-3 layers. Each layer must dry before applying the next. In this way, the craft will be preserved

You will need: salt dough, rolling pin, cookie figures stars, hearts, etc..., cocktail tube, thread or rope for hanging, acrylic paints or gouache, brush, transparent nail polish.
Master Class

Salt dough figures are ready!

You will need: salt dough, gouache, brush, foil, water, permanent marker, transparent nail polish.
Master Class
- Blind the paws of the lamb, forming 4 balls.
- Make a ball of foil, then roll it in the dough so that it is inside. This will be the body of the sheep.
- Attach the body over the legs with some water.
- Blind the head, ears, eyes and horns curls. Attach with water.
- Roll into small flat balls and attach them as wool with some water.
- Dry the craft.
- Paint the sheep with paints and wait until it dries completely.
- Draw eyes, eyelashes and circle the contours of the curls with a marker.
- Cover the craft with varnish and wait until it dries completely.
Salt dough sheep is ready!

You will need: salt dough, rolling pin, stack, toothpick, paints, brush, glitter, clear nail polish, cocktail tube, string for further hanging.
Master Class
- Roll out the dough into a thin layer using a rolling pin.
- Draw a house on the dough, then cut out with a stack.
- Make dots with a toothpick along the contour of the house, window, chimney.
- Make a hole for further hanging with a cocktail tube.
- Dry the craft.
- Paint the house, decorate with sparkles and wait until it dries completely.
- Attach a thread for further hanging.
Salt dough house is ready!
Salt Dough Owl

You will need: salt dough, felt-tip pen cap, stack, paints, brush, clear nail polish.
Master Class
- Roll out a ball of dough.
- Press down on it, making a flat circle.
- Make plumage by pressing with a cap.
- Fold the sides of the circle towards the center.
- Bend the upper part of the circle to the center and form the ears.
- Make the eyes of an owl by pressing the cap of a felt-tip pen.
- Dry the craft.
- Color the owl and wait for it to dry completely.
- Cover the craft with varnish.

You will need: painted salt dough, cookie cutters, cocktail tube, rolling pin, glass, water, clear nail polish.
Master Class

Salt dough curly frame is ready!
Salt dough bear

You will need: salt dough, stack, pva glue, black and pink paint, brush, transparent nail polish.
Master Class
- Blind eyes and nose, paint black and set aside to dry.
- Blind 2 flat circles for the paws, paint pink and set aside to dry.
- Blind the body of the bear in an oval shape.
- Roll up a ball for the head.
- Glue the head to the body.
- Blind a flat ball, draw a smile with a stack and glue it on the muzzle.
- Blind the paws, then glue them and draw the fingers with a stack.
- Roll up the ball and glue the tail in place.
- Glue on the eyes and nose.
- Glue the pink circles on the hind legs of the bear.
- Dry the craft.
- Cover the craft with varnish.
Salt dough bear is ready!

You will need: salt dough, glass, acrylic paints, sequins, brush, hanging ribbon, cocktail tube, dog's foot for printing on dough or your fingers, transparent glue, rolling pin.
Master Class


You will need: dyed salt dough, stack, clear nail polish, toothpick.
Master Class

Salt dough asterisk is ready!
Salt dough caterpillar

You will need: dyed dough, knife, pva glue, toothpick, pendant, transparent nail polish.
Master Class
- Roll out the sausage.
- Cut it into 6 equal pieces.
- Roll up the balls.
- Glue 5 balls together.
- Glue the head.
- Blind the nose and eyes, then glue them.
- Use a toothpick to pierce the hanging spot.
- Dry the craft.
- Cover with varnish and wait until completely dry.
- Attach the hanger.
Salt dough caterpillar is ready!
Salt Dough Apple
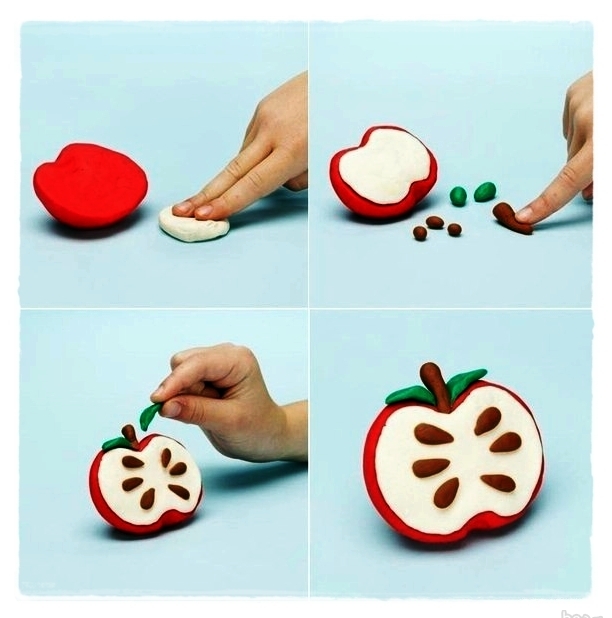
You will need:
Master Class
- Blind half an apple, make the inside flat, pressing it to a flat surface.
- Blind a thin flat center and glue to the main part.
- Roll up 6 seeds and a stick, then glue to the apple.
- Blind the leaves, then glue them.
- Dry the craft.
- Cover with varnish and wait until completely dry.
Salt dough apple is ready!
Salt dough elephant

You will need: dyed salt dough, pva glue, clear nail polish.
Master Class
- Blind the elephant's body by rolling an elongated ball.
- Blind 4 legs in the shape of plump sausages.
- Blind the proboscis.
- Blind the ears of an elephant in this way: roll up 2 flat cakes, glue cakes of the same shape of a smaller size in a different color to them.
- Blind a small ponytail.
- Blind your eyes.
- Assemble the elephant in the following sequence: glue the legs to the body, then glue the proboscis, then the ears, eyes and tail.
- Dry the craft.
- Cover with varnish and wait until completely dry.
Salt dough elephant is ready!
Dachshund from salt dough

You will need: salt dough, simple pencil, scissors, cardboard, paints, brush, rope, toothpick, foam sponge, clear varnish, PVA glue.
Master Class

Salt dough dachshund is ready!
Mushroom mushroom from salt dough

You will need: salt dough, light bulb, paints, brush, foil, cardboard, masking tape, superglue, PVA glue, paper napkins, clear varnish, stack.
Master Class

Mushroom mushroom from salt dough is ready! I recommend watching this video!
Funny pigs from salt dough

You will need: salt dough, paints, brush, foam sponge, stack, thin string, toothpick, black helium pen, PVA glue.
Master Class

Funny pigs from salt dough are ready! I recommend watching this video!

You will need: salt dough, nail scissors, pva glue, acrylic paints or gouache, nail polish brush.
Master Class

Salt dough hedgehog is ready!
Modeling dough is a mass that resembles plasticine, but is softer, does not stick, does not stain, does not have a strong odor and does not cause allergies. How to make salt dough for modeling at home? The best homemade dough obtained from salt, flour and cold water.
Working with plastic mass is incredibly exciting and useful in terms of developing fine motor skills. This contributes to the activation of the points of the brain responsible for the coordination of movements, objective actions and speech. And this is not all the advantages of modeling dough, it is:
- Increases perseverance.
- Develops logic and creative thinking.
- Improves concentration and perception.
- Develops the ability to work with small objects and helps in mastering the intricacies of manipulation.
Every mother can make a useful mass, because the technique is not much different from making dough for dumplings. In the article I will consider the most popular recipes. I will start with the classics, and later I will switch to more complex options.
Classic Salt Dough Recipe
I offer a classic recipe for salt dough for modeling, which involves the use of the simplest ingredients that are present in every kitchen. It is incredibly popular among experienced craftsmen, people with little experience and beginners.
Ingredients:
- Flour - 300 g.
- Salt - 300 g.
- Water - 200 ml.
Cooking:
- Pour salt into a deep container, add some water. I advise you not to use all the liquid at once, because in each case the moisture content of the flour is different.
- After the salt dissolves, add the sifted flour. Mix in a bowl first. After the formation of a lump, transfer the mass to the work surface and complete the process. To increase plasticity, gradually add water.
- Place the finished dough in a plastic bag and refrigerate. After two or three hours salt mass ready to go.
Video recipe
From these proportions, quite a lot of salt dough is obtained. If large crafts are not planned, cut the number of ingredients by half or four. If the mass remains, store it in a film in the refrigerator, just like the slime mass is stored. In this form, it retains its original qualities for a month.
How to make dough in 5 minutes

If salt dough crafts have become a family hobby, I recommend arming yourself with a recipe thanks to which you will make another portion of the elastic mass at home in 5 minutes.
Ingredients:
- Flour - 1 cup.
- Water - 1 cup.
- Soda - 2 teaspoons.
- Salt - 0.3 cups.
- Vegetable oil - 1 teaspoon.
- Food coloring.
Cooking:
- Pour a mixture of salt, soda and flour into a small saucepan, pour in water along with vegetable oil. Put the container on a small fire and heat for several minutes, stirring regularly. Add dye and stir.
- Watch the density of the dough. If it sticks to the spoon, it's done. Put the mass on a plate to cool. After that, knead thoroughly with your hands.
- Store your salt dough in a bag or food container or it will dry out. If the mass has dried up, do not be discouraged. Add some water and mash.
Videos cooking
Quick salt dough has another advantage - a long shelf life. Subject to all the rules, the dough retains its properties for several months. With this material, you will not be bored.
Recipe without starch with glycerin

Some craftsmen cover the surface with a layer of varnish to give the crafts shine. But such a result can be achieved without the help of paints and varnishes, because there is glycerin, which is sold in all pharmacies.
Ingredients:
- Boiling water - 2 cups.
- Flour - 400 g.
- Glycerin - 0.5 teaspoon.
- Sunflower oil - 2 tablespoons.
- Tartar - 2 tablespoons.
- fine salt- 100 g.
- Dye.
Cooking:
- Make a base. In a small container, combine cream of tartar, vegetable oil, salt and flour.
- Bring water to a boil in a small saucepan. Pour in the flour base, add the dye and glycerin. Cook until mass uniform consistency.
- Cool the resulting composition and knead thoroughly. Add flour if necessary.
Having made a figure from dough without starch, you will see that it has a pleasant sheen. This craft will be a wonderful gift for mom on March 8 or a friend for her birthday.
How to make dough for modeling without flour

The highlight of this plastic mass is the absence of flour in the composition. The technology for making salt dough for modeling is suitable for craftsmen who do not like working with a white, quick-tempered ingredient.
Ingredients:
- Starch - 1 cup.
- Baking soda- 2 glasses.
- Water - 0.5 cups.
- Natural food coloring.
Cooking:
- In a deep bowl, mix cornstarch with baking soda. While stirring the mixture, pour in the water in a stream.
- Put the container with the ingredients on a small fire and cook until a ball forms.
- Place the cooled mixture on a floured surface and knead. The dough is ready.
There is no flour in this dough, but it is great for modeling. Use this easy-to-make plastic material to create a variety of shapes that will showcase your talent to others.
What can be done from salt dough - examples of crafts

We examined the technology for preparing salt dough for modeling. It's time to apply salt material at work. If you are a beginner, I recommend starting with the simplest figures. Over time, having gained precious experience, switch to more complex crafts.
Experienced craftsmen make various figures and compositions from salt dough. The result depends only on the imagination. In this part of the article I will give some good examples with step-by-step instructions for making. They will help to learn the basics even for children.
mushroom
- To create a hat, roll a small ball and lightly press on one side.
- Make a sausage. When rolling, press down on one side a little. Get a leg.
- It remains to collect the figurine. To increase reliability, use a toothpick.
- After the dough has dried, decorate the mushroom as you wish.
beads
- Roll the dough into several dozen equal-sized and even balls. Put the balls on the toothpicks.
- Leave the balls on fresh air for a few days to dry. I advise you to turn the beads several times a day.
- Carefully remove the toothpicks from the dried balls. String beads on ribbon or string. For a more beautiful product, color the beads with markers.
Christmas decorations
- Roll out the salt dough into a layer. Using a cardboard stencil or cookie cutter, squeeze out the shapes.
- Use a straw for cocktails to make holes in the figurines. Dry the dough.
- It remains to decorate the Christmas decorations and thread a beautiful ribbon through the hole.
Rose
- Make a cone out of a small amount of dough.
- Roll into a small ball and roll into a cake. Attach the fragment to the cone.
- Attach a similar element on the opposite side. Get a button.
- Roll up a few balls and make petals. Attach to the flower in a circle.
- Bend the upper edges of the petals slightly back, and press the sides.
- After the dough has dried, paint the figurine scarlet.
Puzzles
- Make a large stencil of a figure out of cardboard, for example, a cat. Roll out the dough into a layer. Using a stencil, cut out a large figure. Leave the dough until morning to dry.
- With a sharp knife cut the cat figurine into fragments. Wait for complete drying.
- Color the craft with markers or gouache. After drying, cover each piece with a layer of clear varnish.
Video examples of figurines
As you can see, salt dough is ideal for creating simple and complex shapes and compositions. And that's just a small amount of ideas. With the help of imagination, you can create a variety of toys, jewelry, souvenirs and other crafts.
In conclusion, I will share the secrets of experienced craftsmen who will make working with the material more productive and the result more impressive.
Plastic and accessible to everyone, the material allows you to create unique things for the interior. Salt dough has long been used to make beautiful crafts. From a pliable mass, together with a child, you can fashion figurines of animals, New Year's compositions and even whole thematic pictures.
Features of working with salt dough
Anyone can make crafts from this material - Small child, a beginner to practice the art of modeling, and an adult who has mastered the process back in kindergarten. So that the molded product does not deteriorate, you need to do everything right - prepare the mass for modeling directly and dry the figures. Coloring also has its secrets, which you will definitely learn about.
- How to make salt dough for modeling
The consistency is easy to work with, but for a successful craft, you need the right kneading. If you correctly observe all the proportions indicated in the master classes, then you can make a pliable material. The figures made from it retain their original appearance. There are two popular recipe salt dough, which are successfully practiced among lovers of homemade hand-made.
Recipe #1
- Wheat flour(VS) - 500 g;
- water (necessarily cold) - 200 ml;
- salt "Extra" - 200 g.
According to this recipe, the mass turns out to be of high quality, plastic and edible (which is important). All components of the material can be eaten, so it is great for working with young children during developmental activities. If a child eats a finished craft, then it will not cause harm to his own health. Products made from safe material are the best choice for a curious baby.
Recipe #2
Also suitable for sculpting with kids, because the consistency is plastic and you can sculpt anything you want. During the game, the child must be well monitored so that the mass is not eaten. For cooking, you need to stock up on the following ingredients:
- white flour of the highest grade - 500 g;
- water (cold) - 200 ml;
- PVA glue - 2 tbsp.
The adhesive component in the composition guarantees the stability of the product made from the mass. Such a composition is easy to tint and stain, and in addition, it has a long solidification period (it is easy to correct minor flaws in the finished craft). Try both recipes to find the best one for your own tasks (depending on age, skill, etc.).
- How to dry salt dough crafts

- an obligatory stage in the creation of crafts from salt dough, thanks to which products acquire strength. The drying process requires certain conditions, because when room temperature the figurine will not reach the desired condition, because in twenty-four hours it will dry out by only one millimeter. In the summer you can try to put it in the air, but this will not give much results. It is best to use the oven:
- At a temperature of 75°C, the drying time will be an hour.
- At a temperature of 100 ° C - an hour.
- At a temperature of 120 ° C - half an hour.
- At a temperature of 150 ° C - half an hour.
Large items should take longer to dry, while smaller items can take less time to dry. To prevent the dough from sticking, the baking dish must be covered with foil. Decor in the form of beads, rhinestones, beads should be dried at temperature regime not higher than 120 °C. Do not use a microwave oven or put crafts on a hot battery, otherwise they can instantly deform and crack. From time to time you need to turn the figures in the oven so that they are evenly baked on all sides.
- How to color dough products
The created and dried figurine can be painted in any of your favorite colors. The best choice for these purposes there will be acrylic paint or gouache. The dyed product must be covered with colorless nail polish so that the paint lasts for a long time and does not lose its juiciness and brightness over time. You can make a colored mass by adding the desired tone (it is better to use food coloring) during flour kneading.

What can be done from salt dough with your own hands
Having mastered the technique of creating salty material for modeling, you can easily achieve mastery in which you can make crafts of any complexity. A new hobby may interest not only an adult, but also a child. Plastic dough is a wonderful material for creativity, the development of hand motor skills, concentration and much more. There are a lot of ideas on what can be made from modeling dough, while crafts can be of any complexity and are interesting for children. different ages.
Simple figurines for children 2-3 years old
Having plastic material at hand, you can organize a developmental activity for the youngest children. What can be molded from salt dough for a two-year-old baby? First, you should introduce the crumbs to the material - let them hold the mass in their hands, then clearly show what the dough is capable of, that is, make a bun or a snowman.
Small children are not capable of grandiose crafts, so it's best to start by following the easiest method and doing everything in stages:
- Roll out the dough with a rolling pin, and then press small objects into the finished layer in the form curly pasta, beans or buttons.
- Cut out the dough with cookie cutters.
- Roll balls of different sizes from plastic material, creating little men, a snowman, a bun, a smeshariki.
- Roll sausages, making snails, caterpillars and other elementary figures.

For children 3-4 years old
For children of three or four years old, one rolling is not enough, because the child has already grown up and can perform more complex tasks. interesting idea for creative activities there will be pictures from salt dough. On a piece of paper, the kid with the help of an adult will create a three-dimensional image, and then color it. Pictures can convey any plot: from the seasons and mini-images of the country to episodes of fairy tales and cartoons.

For modeling with children 5-6 years and older
If you don’t give intricate tasks to young children, then creative six-year-olds can master complex crafts from salt dough. For example, these can be figurines in the form of a voluminous sheep, a mouse on cheese, or an original vase with a chic bouquet of flowers. Children at the age of five or six can master the technique of manual work using a salty consistency. Following the example of an adult, a child can cope even with those products that require a significant concentration of attention and manual dexterity.

How to sculpt crafts from salt dough - step by step instructions
The process of sculpting crafts is easy, takes a certain amount of time, but gives a chance to pay attention to your baby. With easy instructions and a few video tutorials at hand, parents can quickly figure out how to make a particular salt dough craft and explain it to their child. There are many product options, choose one or more and get started!
flowers
The created products will look not only beautiful, but also believable. For example, to make a rose, minimal effort is required:
- From the dough prepared in advance, roll out the layer (thickness is not more than half a centimeter).
- With a round object in the form of a glass, squeeze out five identical petal elements.
- Lay the circles horizontally on top of each other so that each component is in contact, protruding by a centimeter.
- Roll the steps into one roll, and then place the whole structure on one side on a hard table surface.
- Spread the petals of the bud on the top of the flower from the center in different directions.

Toys for the New Year
original jewelry made easily and quickly. If you don’t know what can be made from salt dough for modeling for the New Year, consider hanging toys for the Christmas tree. For manufacturing, you will need salt dough, colored paints and wire for fastening:
- Bell. It is necessary to roll out the ball, make a bell-skirt. Attach the tongue to the wire, which will serve as a fastener on the branches of spruce or pine. Dry the finished figure, decorate in bright colors.
- Pendant figurines. Make a figure with a cookie cutter. Poke a hole in the top with a toothpick or cocktail tube. After drying, paint the toys, and thread a dense thread or thin ribbon through the hole.

Crafts for February 23
best gift a man will receive a symbolic gift that can emphasize valor, courage and strength. Thanks to special molds in the form of a tank, a soldier, a ship, you can easily make a gift for February 23rd. To do this, roll out the salt dough into a layer and squeeze the selected shapes out of it with a shape. It remains only to dry the souvenirs and paint them in military color.
Souvenirs for March 8
Flowers are the best gift for Women's Day. Why not make them from salt dough? From plastic material, you can create a bouquet that will delight with its beauty for many years. An excellent gift for a friend, mother, sister, grandmother will be a vase of flowers:
- Make a mass classic recipe, roll out the layer in half a centimeter, cut a rectangle of 15x10 cm from a piece.
- At the top of the figure, create a hole with a cocktail tube. This will make it possible to hang the product on the wall.
- Form a ball from the other part of the dough, roll it out and make a vase, slightly bending the neck. Attach to the prepared rectangular base.
- Roll out three stems, attaching them to the vase.
- Cut out circles for the bud and twist to form a rose.
- Oval figures will serve as petals on which to make stripes.
- Decorate the vase with voluminous balls or chamomile.
- Dry the picture, paint it, and cover it with a layer of colorless varnish on top.

For the holiday, you can make decorative egg pendants with which to decorate cabinet handles, windows, or make an original garland. To do this, you need an oval shape to squeeze flat eggs out of the material. On the top edge of the egg, make a hole for the ribbon with a cocktail tube or a felt-tip pen cap. Put the product on a baking sheet in the oven, dry it, and then apply the pattern you like on the eggs with acrylic paints or gouache. Attach crafts to a long ribbon.
Video
Ideas for creating crafts from salt dough are unlimited. There are a lot of master classes that help you get trained, and then make a memorable gift from a miracle material, for example, for a birthday. For novice craftsmen who want to turn a simple craft hobby into a favorite hobby, a video will help, which tells you step by step what can be done from salt dough for modeling.


