Lush biscuit will definitely become the main decoration holiday table and will win the hearts of the most fastidious guests, and cooking it is quick and easy. noisy festive feast or a family celebration is a good occasion for the hostess to show off her culinary skills. Each hostess has a culinary notebook for such cases, where a very tasty and simple recipe for a biscuit pie is carefully stored. Indeed, for dessert on big holidays, it certainly flaunts on the table gorgeous cake filled with fragrant chocolate or snow-white icing.
Biscuit: types and methods of preparation
There are many types of dough for a cake - puff, shortbread, exhaust. None of them can compare with a biscuit - juicy, fluffy, tender. Biscuit is a special type of dough, it is not always possible for professional culinary specialists. It is even more difficult for beginners, because it is necessary to strictly observe the number of ingredients, cooking processes, and the duration of baking biscuit dough.
There are many biscuit recipes, popular ones:
- fluffy biscuit in the oven;
- simple classic biscuit;
- delicious biscuit with berries, fruits, jam;
- chiffon biscuit.
Cooking delicious sponge cake:
- in a multicooker;
- bread maker;
- in the oven.
Biscuit dough is prepared:
- on kefir;
- on sour cream;
- without eggs;
- with cottage cheese.
Readers will be able to get acquainted with each of these biscuit recipes on the pages of the heading, where they are presented in a simple, accessible language, without complex culinary terms unfamiliar to most housewives. Each guide is presented step by step with a photo, which is important for those who like to spend all their free time near the stove.
Recipes with photos and videos
Young chefs will not have any difficulties or problems if they listen to the advice of experienced chefs. There are a lot of tricks and secrets of making a biscuit at home on the pages of the heading, professionals will be happy to help you avoid common mistakes and simplify the process. And they will tell you a secret very tasty and simple recipe for a biscuit pie. The preparation of a delicious biscuit always begins with kneading the dough. Few people know that the structure of the finished treat depends on how the eggs are beaten with sugar. There are a lot of ways to do a difficult process correctly, in what order to add ingredients, readers will be able to find out on the pages with recipes for biscuit dough.
The success of baking depends on the successful dough and decoration. finished pie. For owners of artistic talent and boundless imagination, there will be no difficulties; they will do an excellent job with decorating a biscuit cake. For those who have never decorated a cake, colorful photos next to each biscuit recipe will help. The illustrations in the smallest detail show every detail that will help biscuit pies and cakes to turn into an original work. culinary arts. Help beginner bakers step by step photos cope with the preparation of dough for a biscuit, because questions will certainly arise, and numerous illustrations will help to find answers.
Increasingly, cakes for sponge cake they begin to cook not traditionally, in the oven, but in a slow cooker. The process is greatly simplified, you do not need to monitor readiness, but biscuit dough growing by leaps and bounds. Baking in a useful kitchen appliance is tender and delicious in taste.
The composition of the biscuit dough
The traditional classic biscuit consists of only a few components, but more and more often not quite ordinary additives are added to it - cottage cheese, honey, kefir. In the post, lean biscuit recipes that do not contain eggs will come in handy. You can enjoy amazing pastries even on a diet, if you exclude especially high-calorie ingredients. All these manuals will certainly be found on the pages, readers will only have to choose suitable recipes and go to the kitchen, create another delicious miracle.
There is a lot of information on how to make a biscuit at home on the Internet, in fascinating culinary magazines, and on television programs. But it is unlikely that it contains such a number of recipes that readers of the rubric expect! Everything is here - from the simplest guides to complex combinations, it remains only to compare the availability of food in the refrigerator, your capabilities and skills. The end result will certainly please all household or guests, especially if the hostess tried and created a huge cake!
No need to be afraid to prove yourself in new types of baking, even if a biscuit at home seems like an impossible task. Simple detailed recipes biscuits, available components, colorful photos, helpful comments and tips will help you overcome any obstacle!
A bit of history
Who invented the difficult and such delicious view baking, history does not mention, but the first records of the biscuit can be found in the ship's logs of the first sailors. delicious pastries dried, sent in boxes and used to the table during a long voyage. The biscuit was stored for a very long time, without being exposed to the appearance of the ubiquitous mold.
During one of the trips, a courtier decided to treat himself to a simple sailor's meal. french king. His amazement knew no bounds, because the pastries turned out to be hearty, tasty and pleasant. The sailor's delicacy after this tasting turned into gourmet delicacy, previously supplemented with cream, decorations and icing, and it was served only at the table of the monarch.
Lush, fragrant, melting in your mouth biscuit is the basis for many cakes and rolls. It should not be dry, hard, break or crumble. It seems that the recipe for making a biscuit is very difficult, but this, fortunately, is not so. Subject to the basic subtleties and secrets of cooking, baking a biscuit is quick and easy. After all, it contains only flour, eggs and sugar. Classic recipe simple biscuit provides for the following proportions of the main ingredients for the dough - a glass of flour and granulated sugar, 5 chicken eggs.
How to make a biscuit at home
As a rule, they prepare a biscuit on eggs, this is an obligatory ingredient present in the biscuit dough. It can be cooked hot or cold, depending on what product you want to bake. It is better to bake a biscuit for rolls in a cold way - it turns out to be light and crumbles less. It can be easily rolled into biscuit roll. hot way allows you to make a dense biscuit, for cakes. It almost does not shrink when baking and does not crumble, because biscuit cakes, as a rule, are soaked in sweet syrups when assembling the cake.
But first, let's remind basic rules for working with biscuit dough.
- If the recipe contains baking powder, cinnamon, vanillin or another dry ingredient, it is pre-mixed with flour.
- The ingredients are not loose (grated zest, soaked poppy seeds) are mixed into the biscuit dough at the very end.
- Butter, if required by the recipe, should be softened as much as possible or ghee should be used, and introduced a little at the very end.
Consider several options for preparing an airy and tasty biscuit for cream pies, rolls.
Recipe biscuit with butter on kefir
Would need:
• kefir - 200 ml
• granulated sugar - 135 grams
• flour - 350 grams
• medium-sized eggs - 4 pcs.
• butter - 160 grams
• soda slaked with vinegar or baking powder - 12 grams
How to make a butter biscuit:
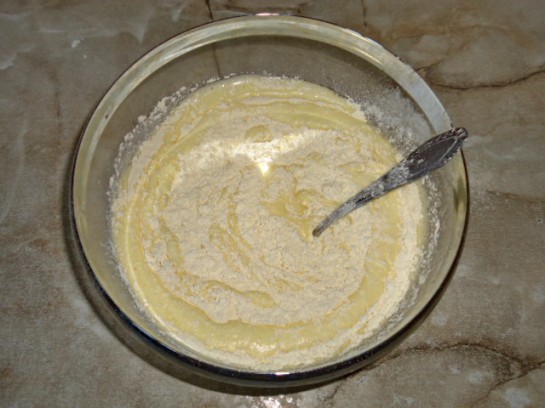
Beat 4 eggs with sugar in a blender or mixer. Beat the egg mixture for at least 7-10 minutes to get a fluffy white strong foam. The more magnificent the foam, the more airy the biscuit will turn out.
Add kefir. Melt the butter in any convenient way: on the stove, in the microwave. Pour it into the biscuit dough. Sift the flour and add it to the bowl with the dough, mix thoroughly. V last turn add soda or baking powder.
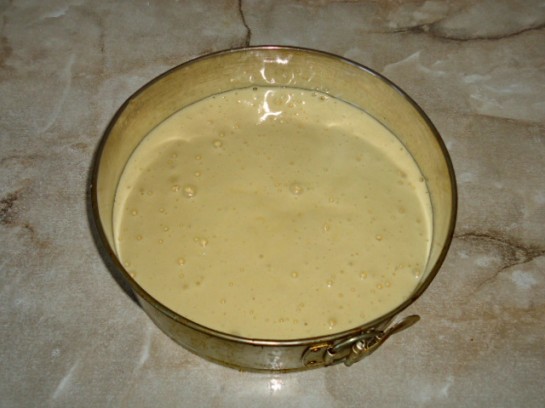
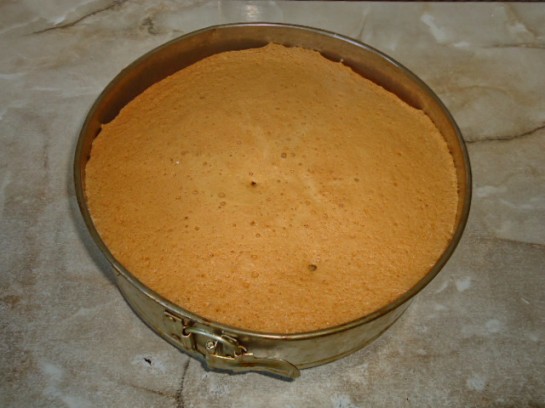
Lubricate the walls and edges of the baking dish with oil, pour the dough mass into it. Preheat the oven to 250C. Put the form with the biscuit dough. Do not open the oven door while the biscuit is baking, otherwise the biscuit may sink and become beautiful. lush pastries will not work. When the biscuit begins to rise a little, reduce the temperature in the oven to 200 C. The airy biscuit cake is baked in the oven for about 30-40 minutes.
At the end of the specified time, remove from the oven, cool slightly and decorate with chocolate, powder, icing, cream or jam. delicious biscuit with butter on kefir is ready, you can serve with tea. 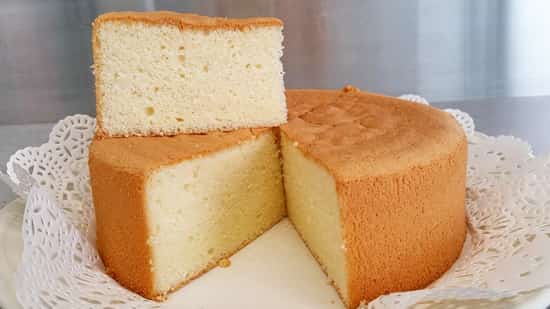
Step-by-step recipe for a classic biscuit in the oven
Products for the test:
• 1 tbsp. flour
• 1 tbsp. Sahara
• 5 eggs
Preparing the biscuit dough:
Consider the preparation of biscuit dough with the same amount of ingredients in two ways.
Biscuit dough cold
Take the eggs out of the fridge to keep warm. Biscuit eggs should be room temperature. Sift the flour through a sieve into a separate container, pour it into the biscuit dough gradually. Prepare two containers - for whipping proteins and for whipping yolks. Dishes must be absolutely clean and dry, without drops of water and foreign odors.
Preheat the oven, it should be preheated to a temperature of 180C (during baking, you can reduce the temperature to 160-170C) when you finish mixing the dough.
Prepare a biscuit baking dish in advance. Choose a pan with high enough sides, because the biscuit will rise a lot during baking. Lubricate the form all over the bottom and a little along the sides - about 1 cm. If you grease the sides over the entire height, the biscuit will “slide” and turn out to be sloppy.
Sprinkle the greased form on top with flour or semolina. Now let's proceed directly to the preparation of the dough.
The yolks are very carefully separated from the proteins and grind white with 0.5 cups of sugar. When all the grains are dissolved, beat the mixture - it should increase in volume by 2-3 times.
Beat the whites in a separate dry bowl with a mixer until stable peaks, little by little the remaining sugar.
If even a little yolk gets into the whites, they will not whip. Then the biscuit dough can be cooked hot.
Well-whipped egg whites are a guarantee fluffy biscuit. If for some reason the squirrels don't want to whip, add salt on the tip of a knife - this will help beat them into a strong foam.
For mixing, we need a wooden or silicone spatula. We very carefully mix a third of the whipped whites with the whipped yolks, do not stir in a circle, but, as it were, lift from the bottom up. Next, add flour little by little (only by hand, without a mixer!) And at the end add the rest of the proteins. Classic biscuit dough should be homogeneous, without lumps. 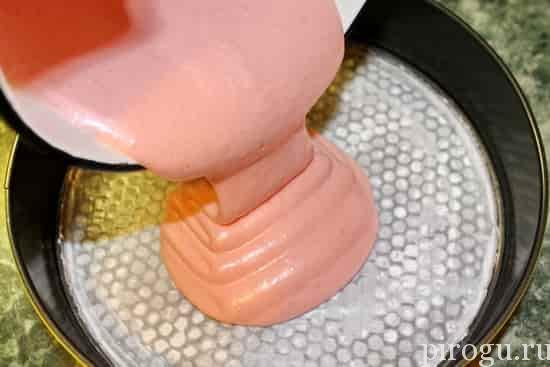
Hot biscuit dough
This method is easier, you do not need to separate the whites from the yolks. But the oven must be turned on beforehand.
With the hot method, the biscuit is made in a water bath. You will need two bowls - a small one and a larger one. Pour water into a larger container and heat, but do not boil! Break the eggs into a small container, put them in a large container in a bath and beat with a mixer until they heat up to about 50C. To check the temperature, you can touch the mixture with your finger - there will be a persistent feeling of warmth.
At this point, remove the smaller container from the bath, but continue to beat, adding sugar, until the mixture reaches room temperature and increases its volume by two or more times. Then gently fold in all the flour, stirring from top to bottom. The classic biscuit dough is ready.
In a baking dish prepared in advance, pour the dough in one motion. Level the surface. We put the form in a preheated oven.
Do not open the oven for at least 20 minutes from the start of baking the biscuit, it may settle and deteriorate.
If at least 25 minutes have passed, you can open the oven and check the readiness with a wooden stick by piercing the biscuit product. If the stick is dry, it's ready. If the top browns too quickly, cover it with a sheet of baking paper or foil - a ruddy dense crust will prevent moisture from evaporating, and the cake will only bake around the edges, while the middle will remain raw.
Ready biscuit elastic on eggs and well behind the form or baking sheet. The fossa from pressing with a finger is easily smoothed out.
As soon as you take out the biscuit form from the oven, immediately place it on a wet cloth, so the biscuit will be easier to get out of the form. Then turn over and leave on a wire rack to cool completely, otherwise the biscuit cake will be soaked and not lush.
Biscuit on lemonade simple delicate airy fluffy
The biscuit is prepared using a slow cooker and a mixer.
Composition of products:
• vegetable oil - 1 glass
• vanilla sugar- 1 sachet
• baking powder - 1 sachet
• flour - 3 cups
• 4 eggs
• any carbonated lemonade or mineral water - 1 glass
• sugar - 1.5 cups
How to evenly cut a biscuit into cakes
Biscuit product cannot be cut immediately. It must stand for at least 6 hours. If you plan to soak the biscuit, then do not touch it for at least 8-12 hours. It is better to make a biscuit in advance.
In order to evenly cut the biscuit cake, use a fishing line or waxed thick thread.
With a knife, mark cuts on the biscuit according to the number of cakes, hook the fishing line in them, bring the ends crosswise and pull. Cut the biscuit with a fishing line like a saw, especially if it is small in diameter.
If you want to bake a roll based on biscuit dough, remember that the dough will be more liquid, not like cake dough. The biscuit dough is then poured onto a sheet of baking paper spread out on a baking sheet. The thickness of the finished layer is different in different recipes, from 3 to 10mm. A thin layer is important not to overdry.
As soon as the biscuit has browned and fluffed up, take it out and put it on a towel sprinkled with sugar, and carefully remove the paper.
Using a towel, roll the layer into a roll and leave until it cools completely. And after that we unfold to apply the filling, and fold again. If you did not remove the baking paper, remove it carefully before refolding. If you let an even layer cool, it will surely crumble when you try to roll it into a roll.
If you bake a roll with a fruit or berry filling, then you don’t have to wait until it cools down, put the filling right away and roll it up hot. 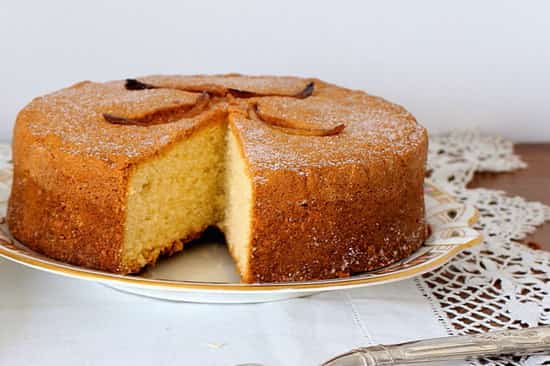
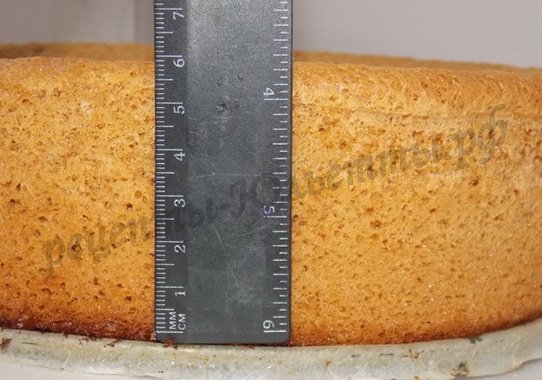
I have never had such a tall biscuit!
Even when I baked a biscuit according to the classic recipe, where it is necessary to carefully separate the whites from the yolks, beat to the point of insanity ... this is not required here, which is very convenient, and the result exceeds the wildest aspirations!
In fact, the dough for this simple biscuit is prepared exactly the same way as for apple charlotte. Only the ingredients need twice as much.
And it turns out a tall, magnificent cake, from which you can build a huge cake for the whole family!
Another recipe for a very tasty, tender, fluffy biscuit appeared on the site - on starch, if you are interested, you can try both for comparison :)
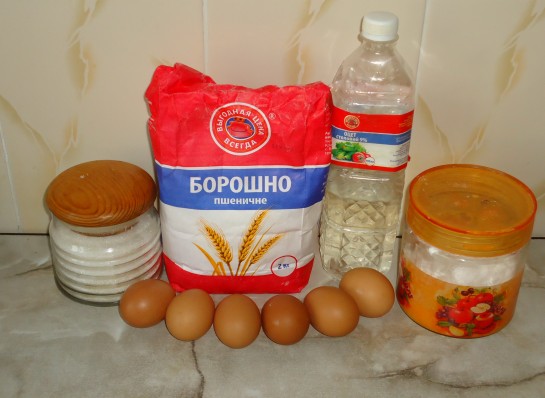
Ingredients:
For a 24 cm form:
- 6 eggs;
- 1 cup of sugar;
- 1 glass of flour;
- 1 teaspoon baking soda(or 1.5 tsp baking powder);
- 1 tablespoon 9% vinegar or lemon juice.
How to bake:

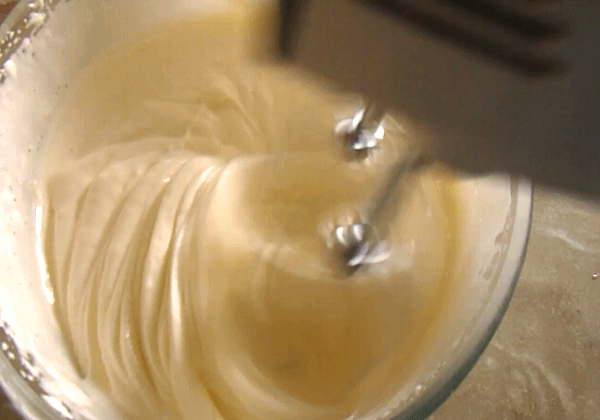
We break the eggs into a high bowl (it is not necessary to separate the yolks, as I already noted), pour a glass of sugar and beat with a mixer until a lush, light, thick mass is formed. It will take 1.5 - 2 minutes. Important! You need to beat, starting at the lowest speed of the mixer, gradually increasing it to the maximum: 1-2-3-4-5 ... (my mixer has 5 speeds, each half a minute or a little more). Look at the consistency of the foam, it should become thick, light, when traces of the mixer beaters begin to remain, that's enough :)
Here's how to beat the eggs for the biscuit dough:
Pour a spoonful of soda on top, extinguish it with vinegar and mix. Attention - update! I read an article where it says that you should mix soda with dry products (flour), and acid to extinguish it (vinegar, lemon juice) with liquid ingredients. And extinguishing it in a spoon or on the surface of the dough is impractical, since all the carbon dioxide that creates bubbles goes into the air, and not into the dough. And since there are no liquid ingredients in this biscuit, except for eggs, I switched to baking powder in this recipe :) I mix it with flour and sift it all together into the dough.
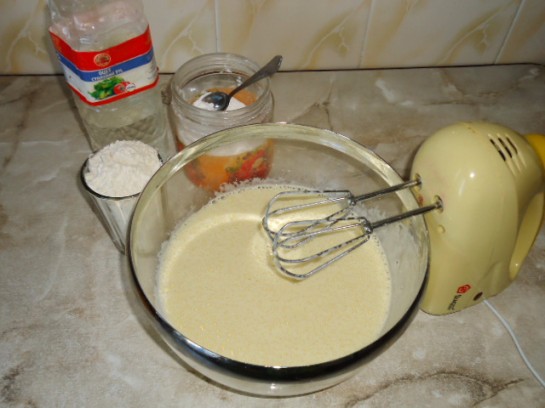
Then gradually add a glass of sifted flour, carefully, but carefully mix with a spoon.
For clarity, here is a gif-image of how to properly mix the biscuit dough:

It is best to bake a biscuit in detachable form, the bottom of which is covered with confectionery parchment or tracing paper, greased sunflower oil. It is most convenient to lay the paper on the bottom of the form, put on and fasten the sides, and then cut off the excess paper along the edge. Lightly grease the inner sides of the form too. vegetable oil so that the biscuit does not stick. But it is not necessary to lubricate too generously: the greasy walls of the mold can prevent the cake from rising.
Better yet, grease the mold with a thin layer of soft butter and sprinkle with flour. Fat will not allow the biscuit to stick, and the thinnest layer of flour will allow the biscuit dough to rise well, increasing the adhesion of the dough to the mold surface due to its texture.
Pour the dough into the mold. This is how a properly prepared biscuit dough pours: it spreads with a wide ribbon.

We put in the oven. The original recipe says to put it in a cold one, but I always put such a dough in an already well-heated oven. It seems to me that otherwise the cake will not fit. And I don't want to take risks and try something.
So, put the form in an oven preheated to 180C and bake at the same temperature until cooked.
And since the cake is high, it will take about 45-60 minutes. From time to time, you can slightly open the door and quietly look into the oven. If the cake is browning around the edges, and the middle is liquid - slightly reduce the heat so that the middle is baked. Just don’t turn it down sharply, otherwise the biscuit will “sit down”. If the cake looks ready, test it in the center with a wooden stick. Is there any dough left on it? Excellent - the biscuit is ready!
We take out the form from the oven, give the cake for 10 minutes to cool, then, carefully cutting the edges with a knife, open the form. We turn the cake over onto the lid of a large saucepan, quickly remove the paper from the bottom and turn it back onto the dish.
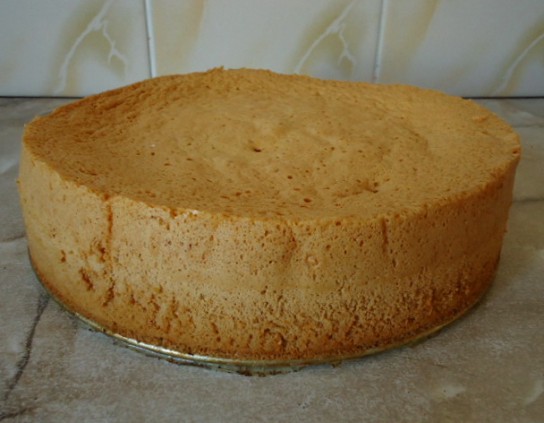
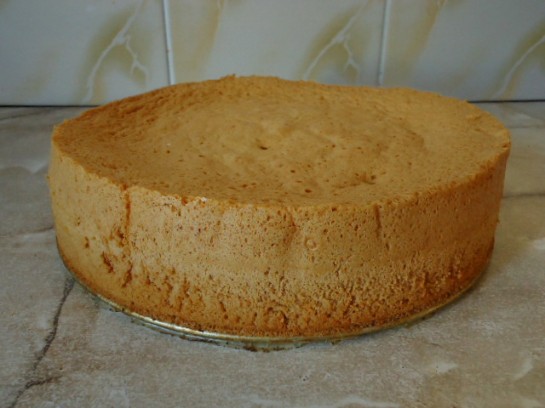
posh tall biscuit ready! When it has completely cooled down, ideally the next day, you can cut it with a sharp wide knife into 2-3 cakes, choose a cream and build a big delicious cake!
It is not difficult to prepare a delicious, lush and tall biscuit. Biscuit will be an excellent basis for pies, cakes, various pastries. simple and quick recipe cooking will delight all housewives. The biscuit cannot be spoiled, the recipe is tested and reliable.
Ingredients:
Flour - 2 cups
egg - 3 pcs
sugar - 1 cup
vanilla sugar - 1 sachet (optional)
milk - 3 tbsp.
baking powder - 1 tsp or 1/2 tsp soda (slaked)
butter - 15 gr (for greasing the mold)
Cooking:
To prepare a biscuit, it is necessary to break eggs into a high container, add sugar, beat the contents with a mixer into a fluffy mass.
Gradually add the sifted flour, stirring. Add baking powder or soda slaked with vinegar or lemon juice. Mix. Pour in milk, add vanilla sugar if desired. Mix the dough well until homogeneous mass, the consistency of thick sour cream.
Grease a baking dish (diameter no more than 22-23 cm) with butter. Fill with prepared dough and place in an oven preheated to 180 C. Bake until golden brown 25-30 minutes. If necessary, check with a toothpick or wooden stick. It also bakes well and is very tasty.
Cool the finished biscuit. Remove from the mold, cut lengthwise if necessary, etc. Optionally, you can add poppy seeds, raisins, nuts, candied fruits to the dough.
Bon Appetit!

